Coffee Table Change

Early last year I was walking around the Salvation Army when I spotted a $27.00 coffee table. The furniture caught my attention because it was quite large – 42 inches in diameter! At the time all five of us were living in an 800 sq.ft. apartment so this was not the ideal piece of furniture for me to pick up. However, I knew we would be moving into our much larger house within months and it was going to be in desperate need of a large coffee table. Hard to find for cheap. Soooooo…I bought it and it has remained as is for over a year.

Our 13 year old rug and Salvation Army coffee table

Besides just being a coffee table, this furniture is used as an ottoman, a toy holder, a cartoon watching seat, base during tag, and the origin for many leaps of faith to the couch.

Here’s the new and improved living room

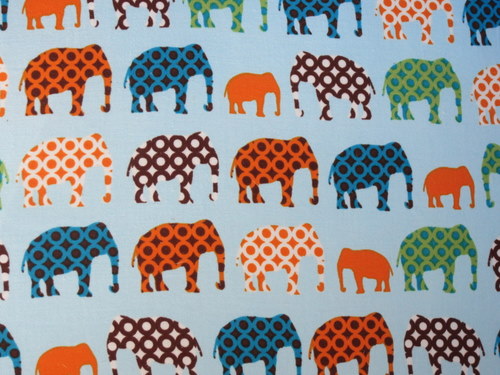
Newly covered coffee table & two 5 x 8 IKEA rugs

I chose the bold graphic since it was similar to the one used in our connected kitchen

Here’s what we did to the coffee table

Took the fabric off and sanded down the wood

Stained the furniture – wore gloves for the messy job

Used the old fabric as a template for cutting the new fabric

The fabric is by Annie Selke and its called Links Indigo. I bought it through JoAnn’s fabric store when it was on sale for 60% off).

Used staple gun to secure fabric.

Sprayed scotchguard on the fabric

Hot glued the remaining edge down.

Cursed when I cut the fabric too close to the edge

Viola – this too can be yours in four short weeks

On the new IKEA carpet

Placed in its perfect spot

Perfect to jump to the couch from it

Perfect to jump to the chair from it

Just perfect

Next up – new pillows!

I have piles of fabric just waiting to be used.

Have you improved upon any old furniture lately?

******Remember to enter my giveaway which ends Thursday night******

Tuesday To Do Party Todays Creative Blog

Fun with Rolls

The last week of summer vacation was a little bit of a challenge in our family.

Everyone had been around each other just a little too long.

Arguements errupted for no reason, whining occurred at record amounts, and my patience was shot.

I knew I needed a project for the boys to work on so I scowered my house for ideas.

When I came across these fabric tubes in my guest room I was inspired.

Presenting..the Two Story Challenge

Using these tubes, get your hot wheels cars downstairs without using the steps.

And no, you may not throw your cars down.

After removing the fabric from the rolls, they got right to work.

A simple design was developed and executed using lots of duck tape

3…2…1….Go!

The tubes were taken apart at one point due to the two year stuffing objects at the top

Towels were placed at the bottom of the chute in order to protect the floor

A few hours into the challenge the basket was added

The basket was a necessary component to rest their weary legs

Eventually the picture was removed for fear of car and basket damage

If we ever need to get water from a well my kids are ready

This entertained my kids for three days! Obviously there were interuptions due to meals,  trips to the pool, and sports practices but listen to me when I say THREE DAYS!

There was even talk of adding a loop next time.

Go beg, borrow, or steal some fabric tubes from your local fabric store!

Jewelry Holder

I love necklaces but never seem to wear them since they are always at the bottom of my jewelry bag.

Out of sight, out of mind.

Therefore, I decided to make a jewelry holder which allowed me to view my collection.

Several months ago I found an old spice rack at Goodwill for $2.99. I originally bought the rack with the intention of using it for storage in my craft room but eventually decided against it.

Yes, someone else attempted some lovely DIY before me.

First step – Sanded the piece down

Second step – Cut off the middle shelf and dowel to allow for the necklaces to hang

Cutting the shelf left holes so wood putty was used to fill them

Third step – Paint (primer from the garage), add hooks ($3.94), and secure to closet wall

Fourth step – Hang jewelery

The little shelves allow me to display bracelets and gives me a place for my earrings in boxes 

Before

After $6.93

Hopefully, I’ll wear more jewelry now that I will see it every day

Do you have a favorite way to display jewelry?

Todays Creative Blog Tuesday To Do Party Creations by Kara

Chair Redo – Guest Post By Kelly

My sister Kelly has graciously agreed to guest post today about her furniture redo. She is our family traveler, a mighty fierce businesswoman, and always up for fun. Kelly is slowly adjusting to Chicago winters by taking extended tropical vacations.

Aunt Kelly & Caroline at our sister Amanda’s wedding

 Hi, I’m Jennifer’s sister Kelly. I am thrilled to write my first ever blog post and share with you my little bit of creativity. To set things straight, Jennifer is the creative one, I didn’t inherit 1/10th of her DIY, artistic abilities. However, when you are trying to find ways to not constantly spend (bleed!) money, but improve your house at the same time, you have to get creative.

I inherited this Adirondack chair a couple of years ago and it has just sat on my patio for the last couple of years.
I was ready to throw it out and go purchase new furniture, however, given that I live in Chicago and we frankly don’t have that long of a summer to use outdoor furniture, I decided to give it a shot to see if I could re-purpose it.

  1. I sanded all of the old paint chips off the chair just using sandpaper sheets
  2. I decided to use some left over blue and purple paint samples I had laying around from another project.  I had great aspirations of painting lots of different stripes, but then realized paint samples just don’t really contain all that much paint!
Paint Samples & First Coat of Paint

I let the first coat dry overnight and then painted a second coat which actually ended up being a different color (hey, I ran out of the first sample, I was trying not to spend much money!)

  1. The final step was to add a coat of polyurethane to seal the paint and hope that maybe it will survive one Chicago winter

The only money I spent was for the container of polyurethane which was about $8.  A new Adirondack chair costs well over $100, so I feel pretty good about my DIY project.

Job well done Kelly! I am so impressed that you started and finished a project in one weekend. Unheard of around here.

Have you salvaged any old furniture like this?

Pitching a Tent

Our house is where bed linens go to die.

It is beyond ridiculous. Enter my closet and you will find an abundance of old comforters, worn sheets, mismatched pillowcases, and scratchy throws. We could probably open a homeless shelter in our backyard if we so desired. We don’t.

Actually we have more sheets than all the other linens combined. We have inherited sheets from our parents, been given sheets as a gift, and received my sisters’ old college sheets.

I choose to ignore any subtle hint they are sending about the state of the bedding in my house.

The sheets leave our house at a very slow rate. If they ever escape it was via the Goodwill box so we have a large stack of sheets in my closet. Stack might be a nice term to describe the linen mess. It is actually a huge pile of sheets thrown every which way. I believe being able to see your closet floor is highly over rated. Technically, I think the experts call it protecting your carpet. After all, I do have children pooping in my closet.

After reading about Fort Fridays on All About Boys I was inspired to make good use of the old sheets and create a massive tent for the kids. The size of the previous tents constructed have been restricted to the size of the sheet, often leading to yelling and complaining, “He pulled the tent down!”  Factor in space taken up for chairs to hold the tent up and the actual sitting space is quite limited.

So….I started with 1 king top sheet, 1 queen top sheet, and 3 pillow cases.

I sewed them together on my machine in a haphazard fashion refusing to pin anything. It took, ten minutes at the most.

The result was a massive section of material roughly 10 feet x 25 feet. I could be exaggerrating here. I am just taking a guess. Put a queen sheet and a king sheet together and you will have the exact measurements.

The pillow cases spaced out created nice entry points into the tent.

When I peeked into the tent I saw this – Alex reading to Caroline while she sat quietly and listened. I am now putting him in charge of nap time.

The boys have requested I add another sheet onto the tent. I will certainly comply if it means more time pretending and less time asking to play the computer.

Any tents in your house this summer?

Photobucket Weekend Bloggy Reading

Kitchen Bench

We have a window seat in the kitchen which the kids use to sit on when they eat. The table gets pulled up close so they can eat easily. It’s practically been a year since we moved into our house so we thought we’d give them something comfier to sit on. Here’s the before picture:

Derek started by cutting two boards into the needed size. The seat is 116 inches long so two boards were necessary.
Next we bought 4 inch foam from the craft store & spray adhesive.
The craft store used an automatic knife to cut the foam so we  decided to cut our foam this way too. Great idea until we realized we didn’t have an automatic knife. Turns out stores don’t carry these unless it’s Thanksgiving. We finally found ours at Dillard’s.
Derek is cutting the foam – I would have loved a chance to try but I think he was enjoying it too much.
Next, we put the boards on top of the fabric. We used a staple gun to secure the fabric on either side. We spent plenty of time trying to get the pattern on the fabric in the center.
Once the long sides were secure, we folded and stapled the short sides.

Here’s a shot of one completed board. (I originally bought a different fabric for the project but it was about 5 inches too short –  Great measuring from a math teacher!)
Close up of the pattern: Waverly Sun N Shade Parterre Indigo – I bought outdoor fabric since it’s described as durable, and in this family, we need durable. When we finished making the boards, we used scotchguard to further protect the fabric.
The final product! I love it and more importantly, I think the kids do too.
My next goal for this area is to figure out buy some artwork for the wall.
Have you completed any home improvement projects recently?

Display Board for Kids Room

Do you have a large frame you haven’t used in years? We have several and I decided to turn two of them into something useful for the boys’ room. Since our marathon displays have been in a closet for probably five years I decided it was time to change them up.

After taking the back off of the frames, I sprayed them with red paint. The boys have red beds in their room so I decided the frames would coordinate nicely with those.

I had some chicken wire lying around and decided to use it. Yes, I know. We do not live on a farm and I just happened to have some chicken wire lying around. Last summer I was going to make a jewelry holder using a frame and the chicken wire but I never got around to it. So, yes…I had the chicken wire just sitting around.

The frames were 22 x 26 inches so we cut out a piece of wire that was 24 x 28 inches. This gave an extra inch on each side for bending and stapling.

I declined to include pictures of our bloody hands from the wire. This was for the benefit of everyone with a weak stomach.

Derek bent the wire edges roughly 90 degrees using pliers. The bent section was the extra one inch of wire initially added on.

He then stapled the wire in place.

We hung the boards on the wall using the same wire that was originally on the frame.

The boys were able to each place their special papers (drawings of their imaginary soccer teams) and ribbons on their own board using clothespins. (We didn’t make a cork board for the boys since having the push pins around would have been dangerous for Caroline.)

If I was a true “crafter” I would have decorated the clothespins with glitter or scrapbook paper but frankly that seems like too much work to me.

The final product – I love it!

The Girl Creativecrafttopsy turvy tuesdaysToday's Creative Blog

IKEA Elephant Off My Back

Why is it projects always take 98% longer than you think they will?

I bought this IKEA chair back in January. It was in the clearance section since it didn’t have a bottom.

chair with no cushionI picked it up and thought, “Great project for the weekend.”

I don’t know why I still think I will get anything accomplished the first weekend it’s on the to do list. By now I should know once I put it on the list it may be completed within the same season it was initially written down in. For instance, my list for this weekend had 12 things on it, we accomplished three of them – actually, not too bad for us.

One of the projects was – FINISH BLUE IKEA CHAIR

suppliesSupplies: oval wood disk, batting, fabric, staple gun

Fabric: Urban Circus Laurie Wisburn Elephant blue – bought here

We used two layers of batting for the “comfy bun” factor.

Stapling

Uhhh, more stapling

FINISH BLUE IKEA CHAIR

This project was frighteningly simple and it took us just 15 minutes to complete.

That is, 3 months and 15 minutes.