Inspired

One of the best parts about linking up to craft parties is perusing through other blogger projects. This week I have been inspired by many creations. Here are a few of my favorites:

Freshly Completed made this amazing Birthday Seat which slips over a chair. The word boy is removable since its attached with velcro and can be replaced by the word girl. If this seems too complicated even a hand made sign and balloons above the birthday chair would be special.

Minimoz created Super Hero shoes which would go over very well with the cape loving crowd at my house

Minimoz also created this love map which I will be replicating somehow somewhere in my house.  Inside the frame are three hearts made of maps which represent cities in which- “We met,” “We married,” & “We live.”

Britches and Boots gives a clear and simple tutorial for freezer paper stenciling – I just love this gnome shirt. The possibilities are endless.

One Artsy Momma shared a brillant way to capture first day of school memories. Wouldn’t it be so much fun to do these every year and place them in an album to share when they graduate from high school.

We Learn As We Go shares the simple recipe (even I might be successful with this) for Graham Cracker Toffee.

The Nature of Grace shared spoon puppets which I know my kids would love making


The Mommy Diaries organized a delightful The Very Hungery Caterpillar 1st Birthday for her son

We are beginning to prepare for Halloween party and Design DNA has created something I will surely be adding to our decor. I can’t wait to fill the jars with eyeballs and growing body parts.

I am going to be busy this weekend working on some new projects.

Did you see anything that inspired you?

Jewelry Holder

I love necklaces but never seem to wear them since they are always at the bottom of my jewelry bag.

Out of sight, out of mind.

Therefore, I decided to make a jewelry holder which allowed me to view my collection.

Several months ago I found an old spice rack at Goodwill for $2.99. I originally bought the rack with the intention of using it for storage in my craft room but eventually decided against it.

Yes, someone else attempted some lovely DIY before me.

First step – Sanded the piece down

Second step – Cut off the middle shelf and dowel to allow for the necklaces to hang

Cutting the shelf left holes so wood putty was used to fill them

Third step – Paint (primer from the garage), add hooks ($3.94), and secure to closet wall

Fourth step – Hang jewelery

The little shelves allow me to display bracelets and gives me a place for my earrings in boxes 

Before

After $6.93

Hopefully, I’ll wear more jewelry now that I will see it every day

Do you have a favorite way to display jewelry?

Todays Creative Blog Tuesday To Do Party Creations by Kara

Guest Post by Michelle Paige

I have a special treat for you today.

Michelle Paige has graciously agreed to guest post here today.
Her blog has so many creative ideas for any occasion.

Some of my favorites from her site are Knights in Training Birthday, Lollipop Valentines, Easter Egg Heads, and an “About to Pop” Baby Shower.

Take a moment and explore her site. I promise you won’t be disappointed.

Hi!  I’m Michelle Paige and today is my very first guest post, ever!!
This is so exciting, I hope I don’t mess up!  Thanks for having me, Jennifer!

My blog is called ‘Michelle Paige’.  (Super creative name, huh?)
I sort of fell into the blogging world one night last February and I haven’t been able to stop!
How fun it is ‘meeting’ amazing women who share such inspiring ideas and insights through their blogs!
Over at ‘Michelle Paige’ I love to blog about crafty ideas, party decor, organization tips, family activities, faith thoughts and my favorite kid craft projects!
Speaking of kid craft projects…you won’t believe this one…
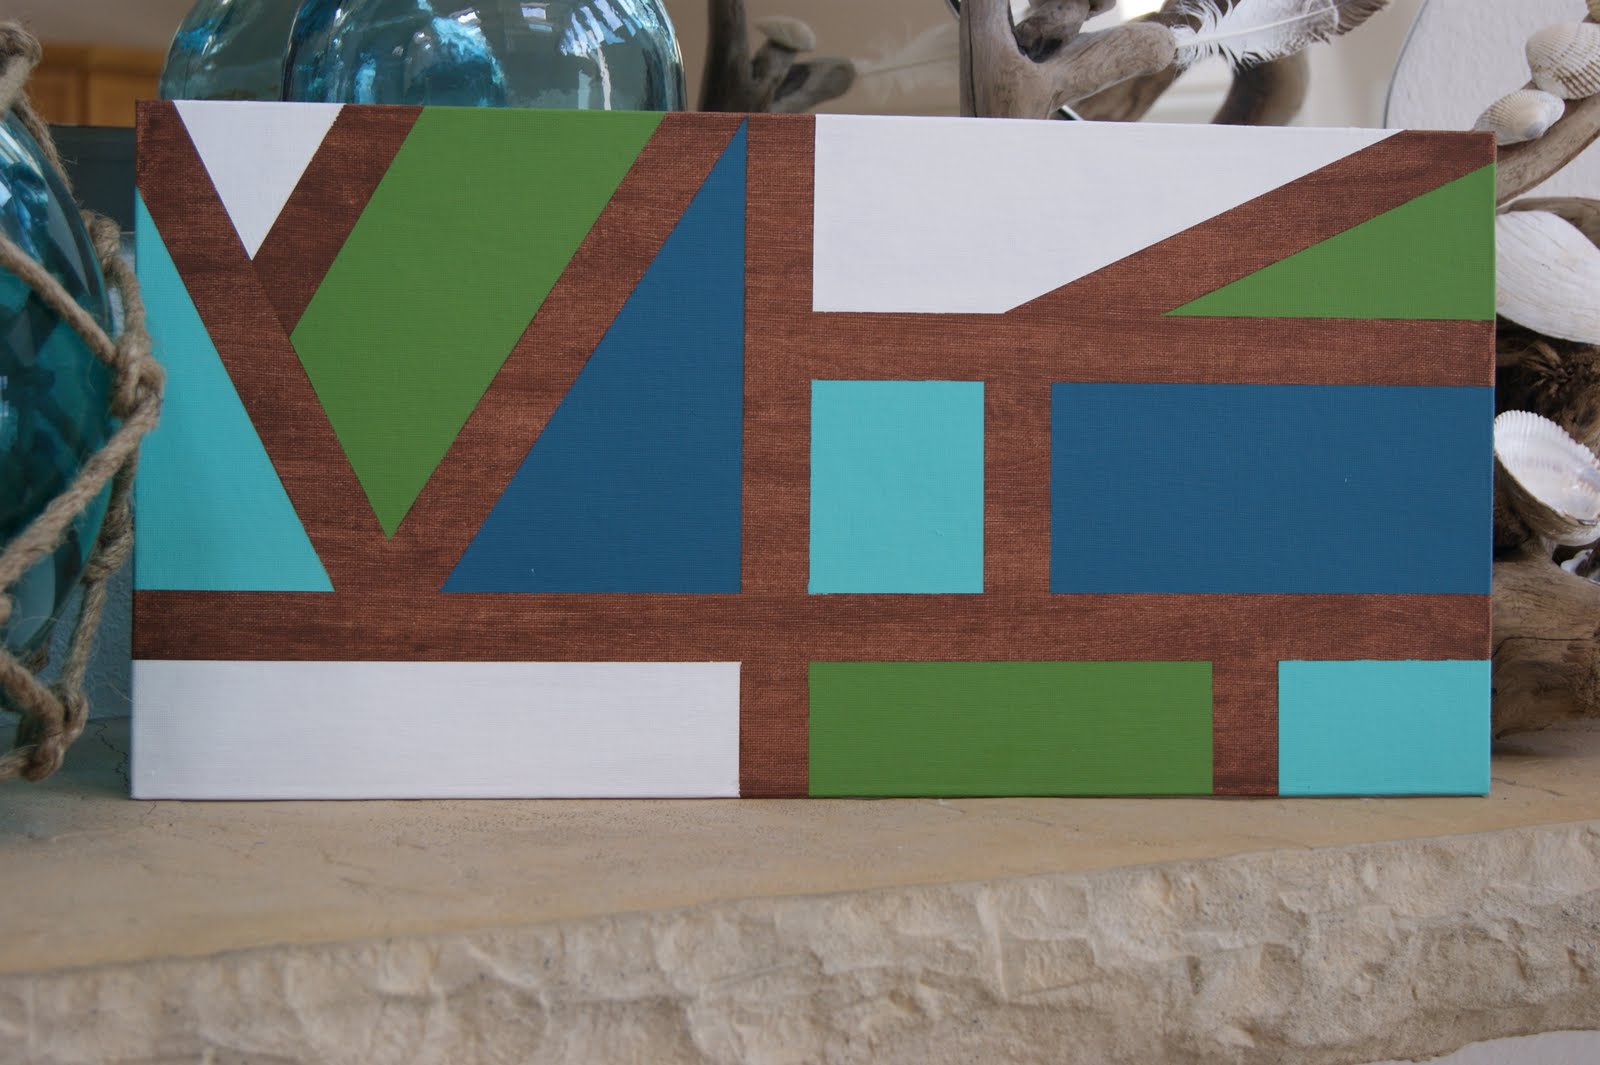
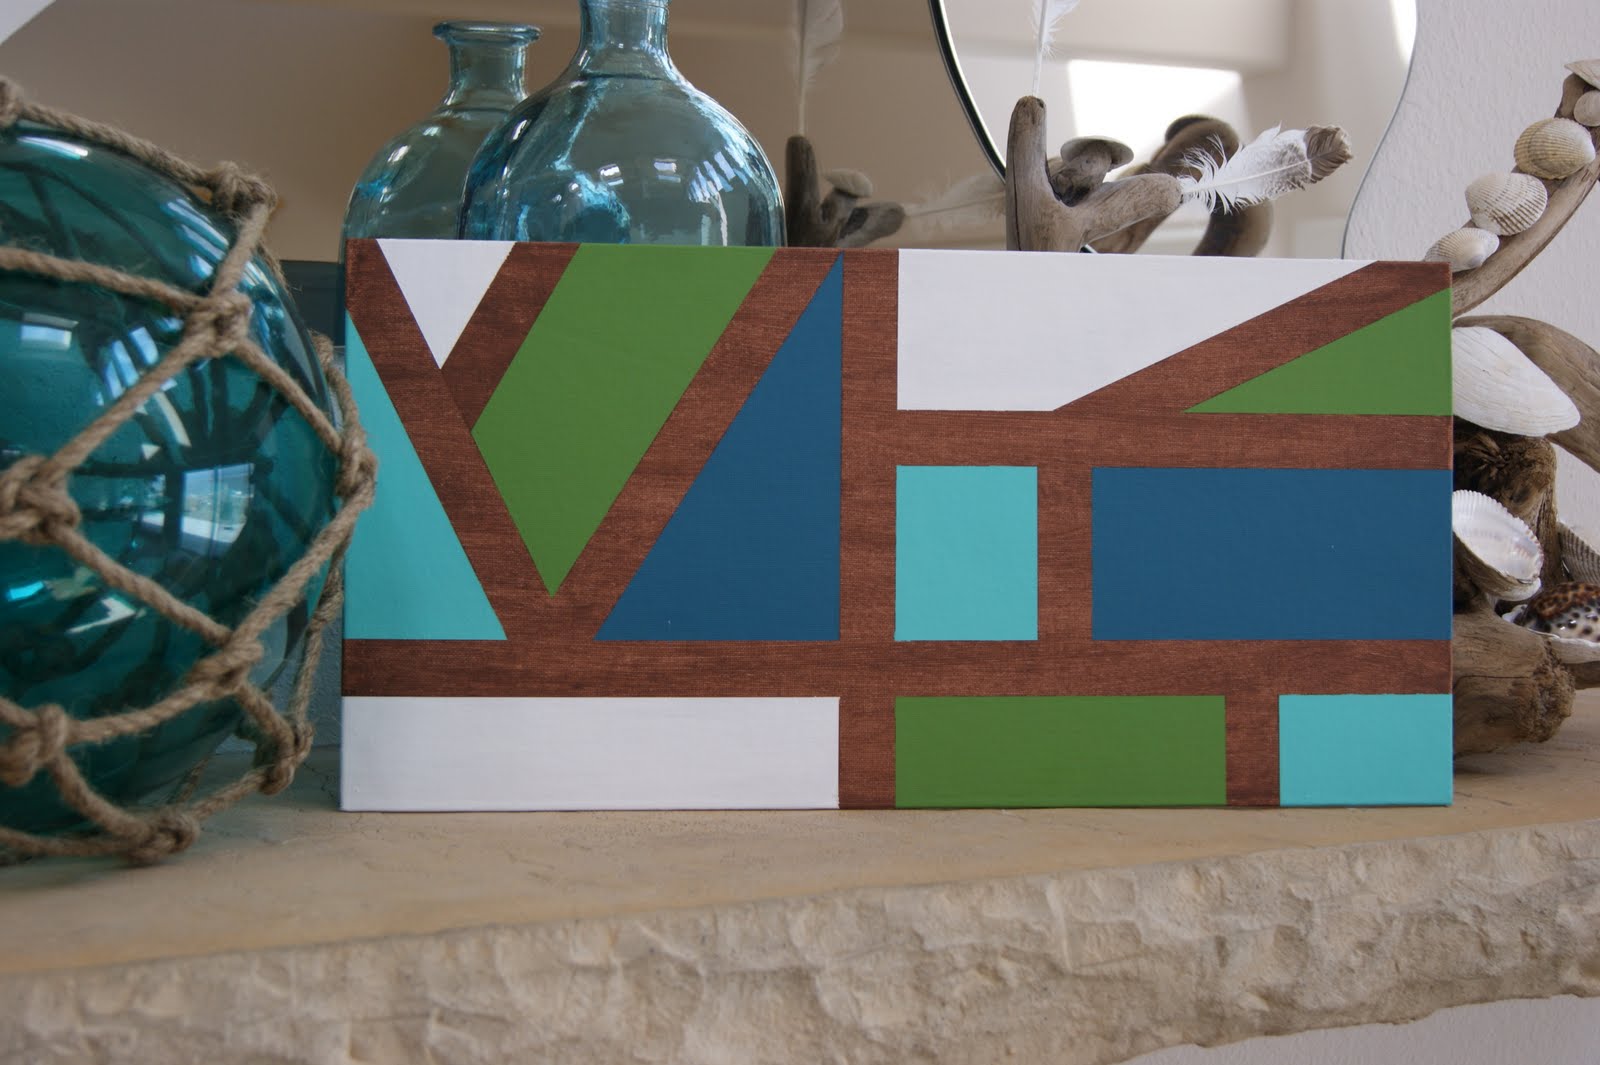
Painter’s Tape Canvas Art
I know…I know…it doesn’t look like a kid made this!
 With just a tiny bit of supervision and guidance—
and lots of play time in between steps—
my 9 year old really made this!
He’s very proud of himself, too!
(Unlike my 10 year old daughter who hides when she sees the camera
— fearing that I might post a picture of her!)
See just how simple this is…
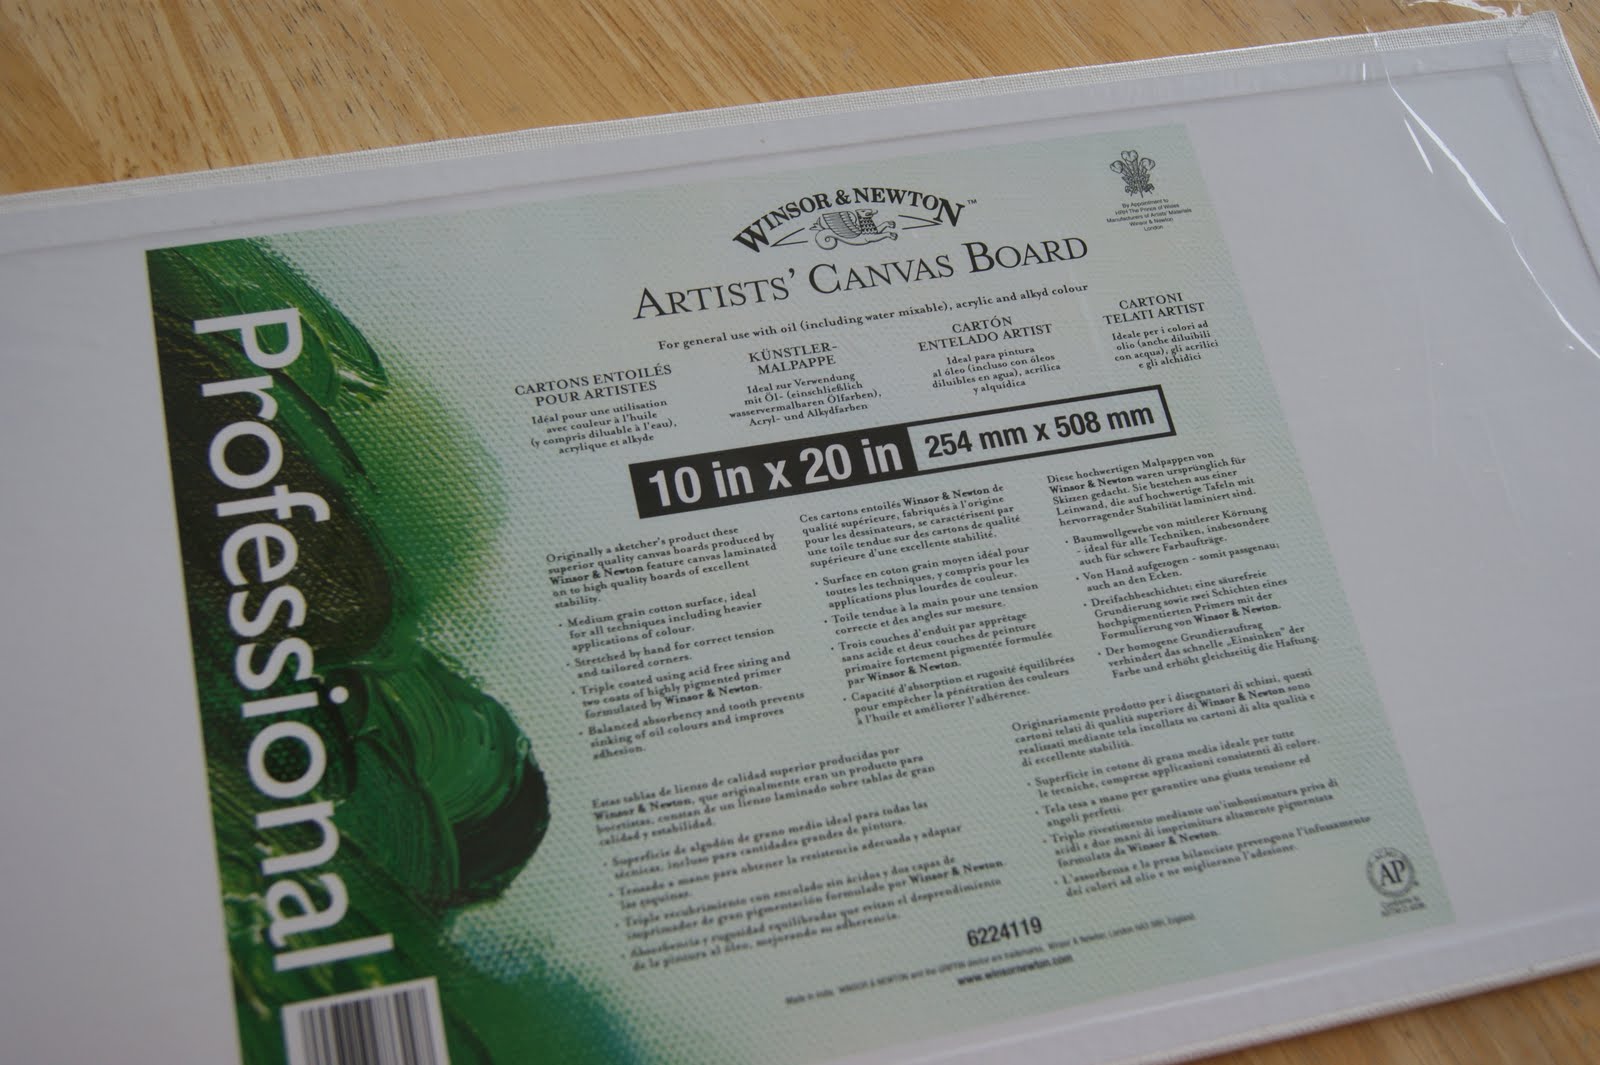
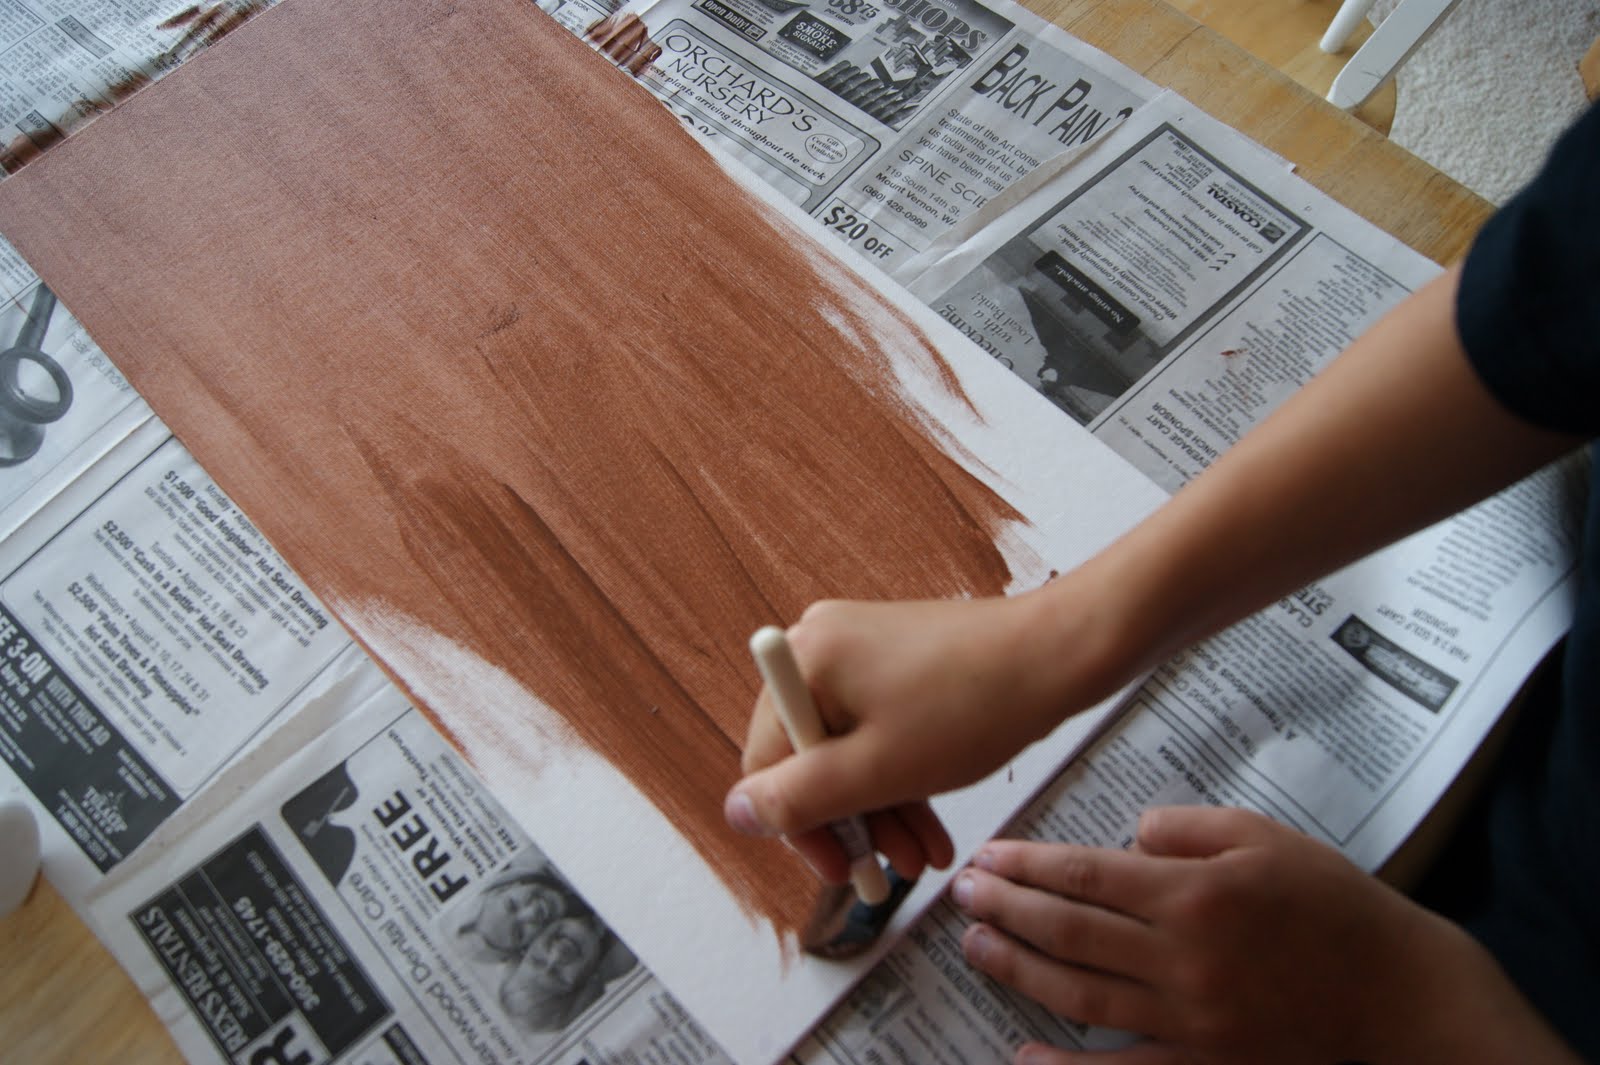
Start with a piece of canvas board.
You can find canvas board at your local craft store or art supply place.
Look for sales or use coupons, canvas can be a bit pricey!
We found this 10in x 20in. piece for half off.
(If I’d been smarter, I would have bought out their stock at those prices!)
Any size of canvas board will work.
Now choose your colors!
I chose brown for the lines and my current favorite decorating colors:
turquoise, leaf green, north sea blue
and white (somehow the white didn’t get into the picture?)
Inexpensive acrylic craft paint works perfectly.
(Or use any leftover paint you may already have.)
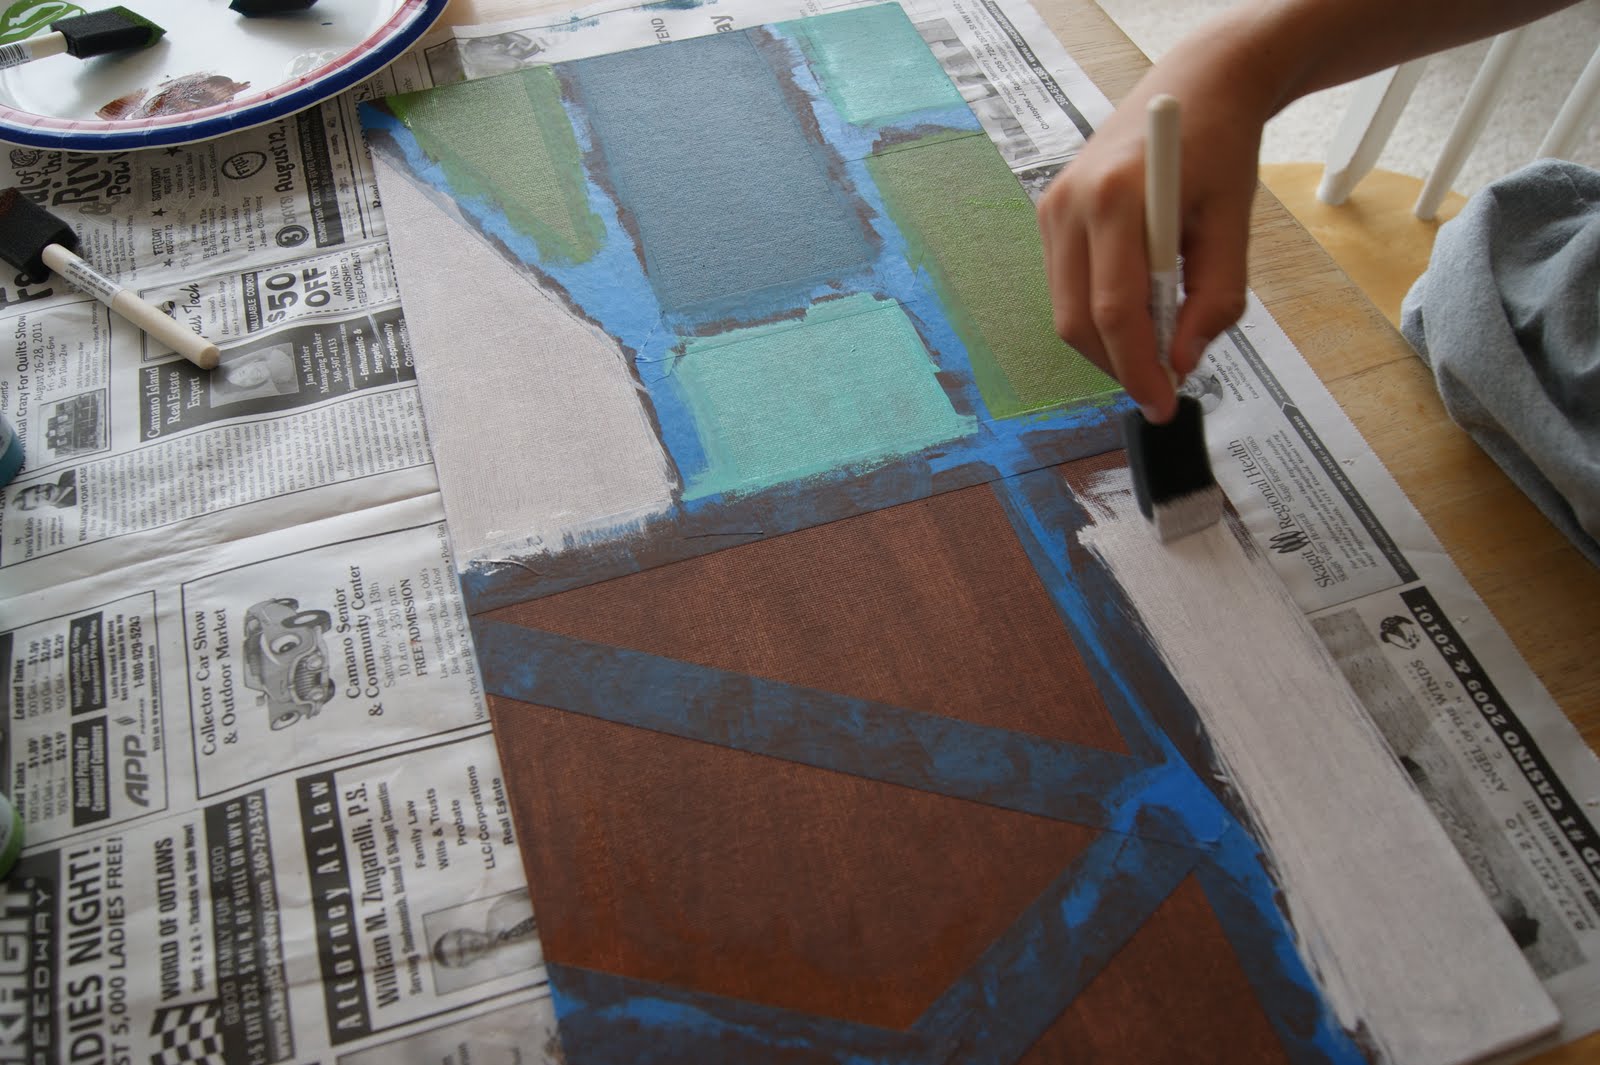
Cover your area with newspapers.
Using a foam brush, paint (or have your child paint) the entire canvas board with the line color of your choice.
We used a brown velvet color.
Now, wait about 30 minutes (go play), then paint a second coat.
(We only did 2 coats, but I think 3 would have been a bit better.)
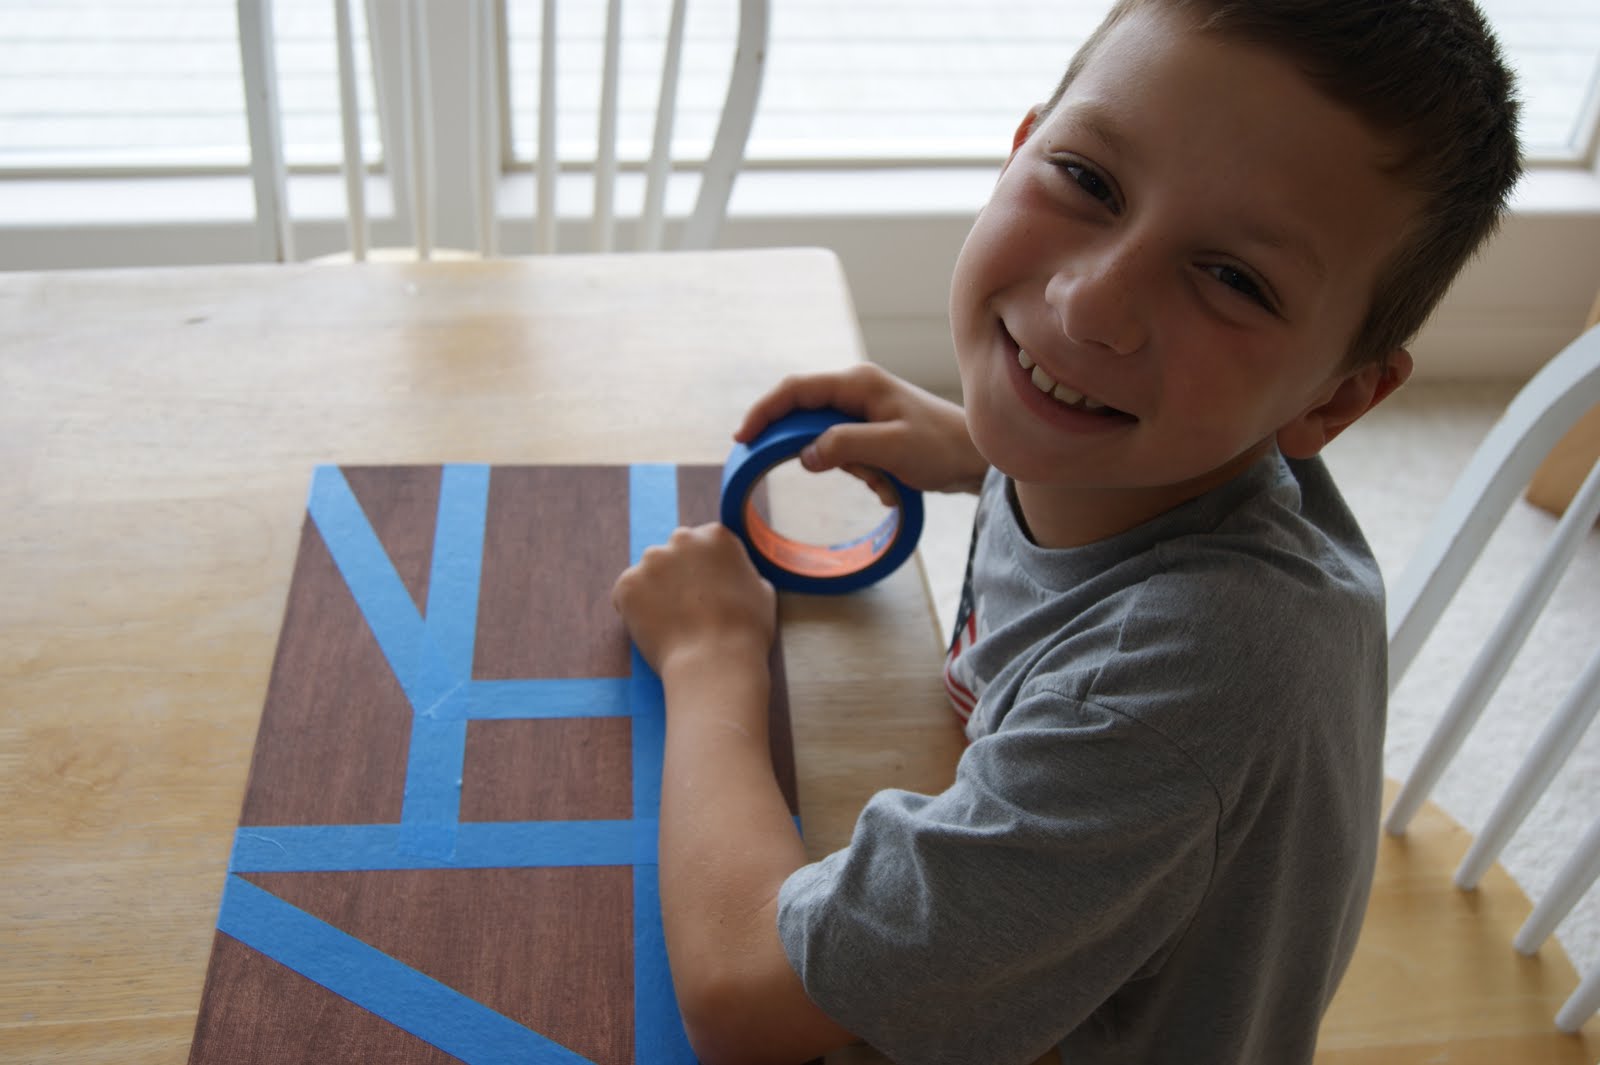
After the board is completely dry (or playtime is over), it’s time to tape.
Use painter’s tape to make straight line shapes on the board.
(We used 1 inch wide Scotch 3M Blue Painter’s Tape.)
The only rule is to keep the tape straight, don’t try to curve the tape.
Make squares, rectangles, triangles, funky 4-sided shapes, etc.
Some shapes can be small, others can be over-sized.
Once you’re happy with the taped design, press tape firmly.
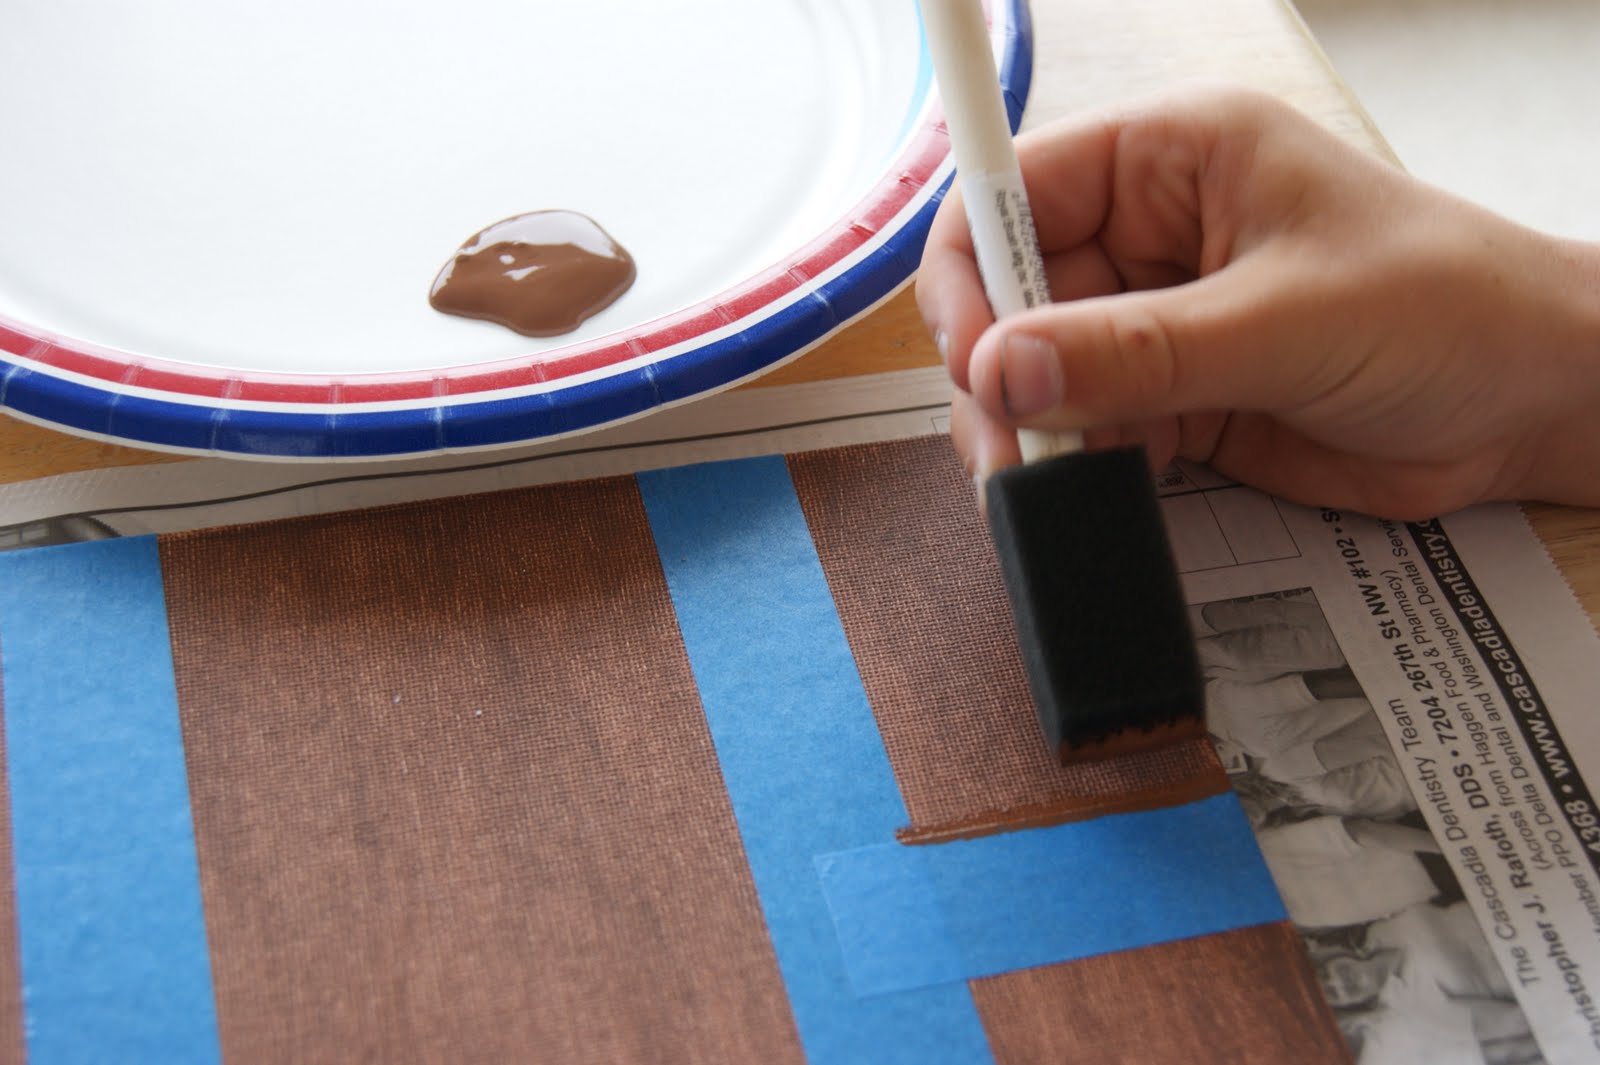
Get out the line paint color again and lightly paint another coat.
This time paint especially along the edges of the tape.
(You can skip this step, but you’ll be sorry!  Trust me!)
This extra step allows no colors to bleed through the tape.
Go play for 30 minutes while the board is drying.
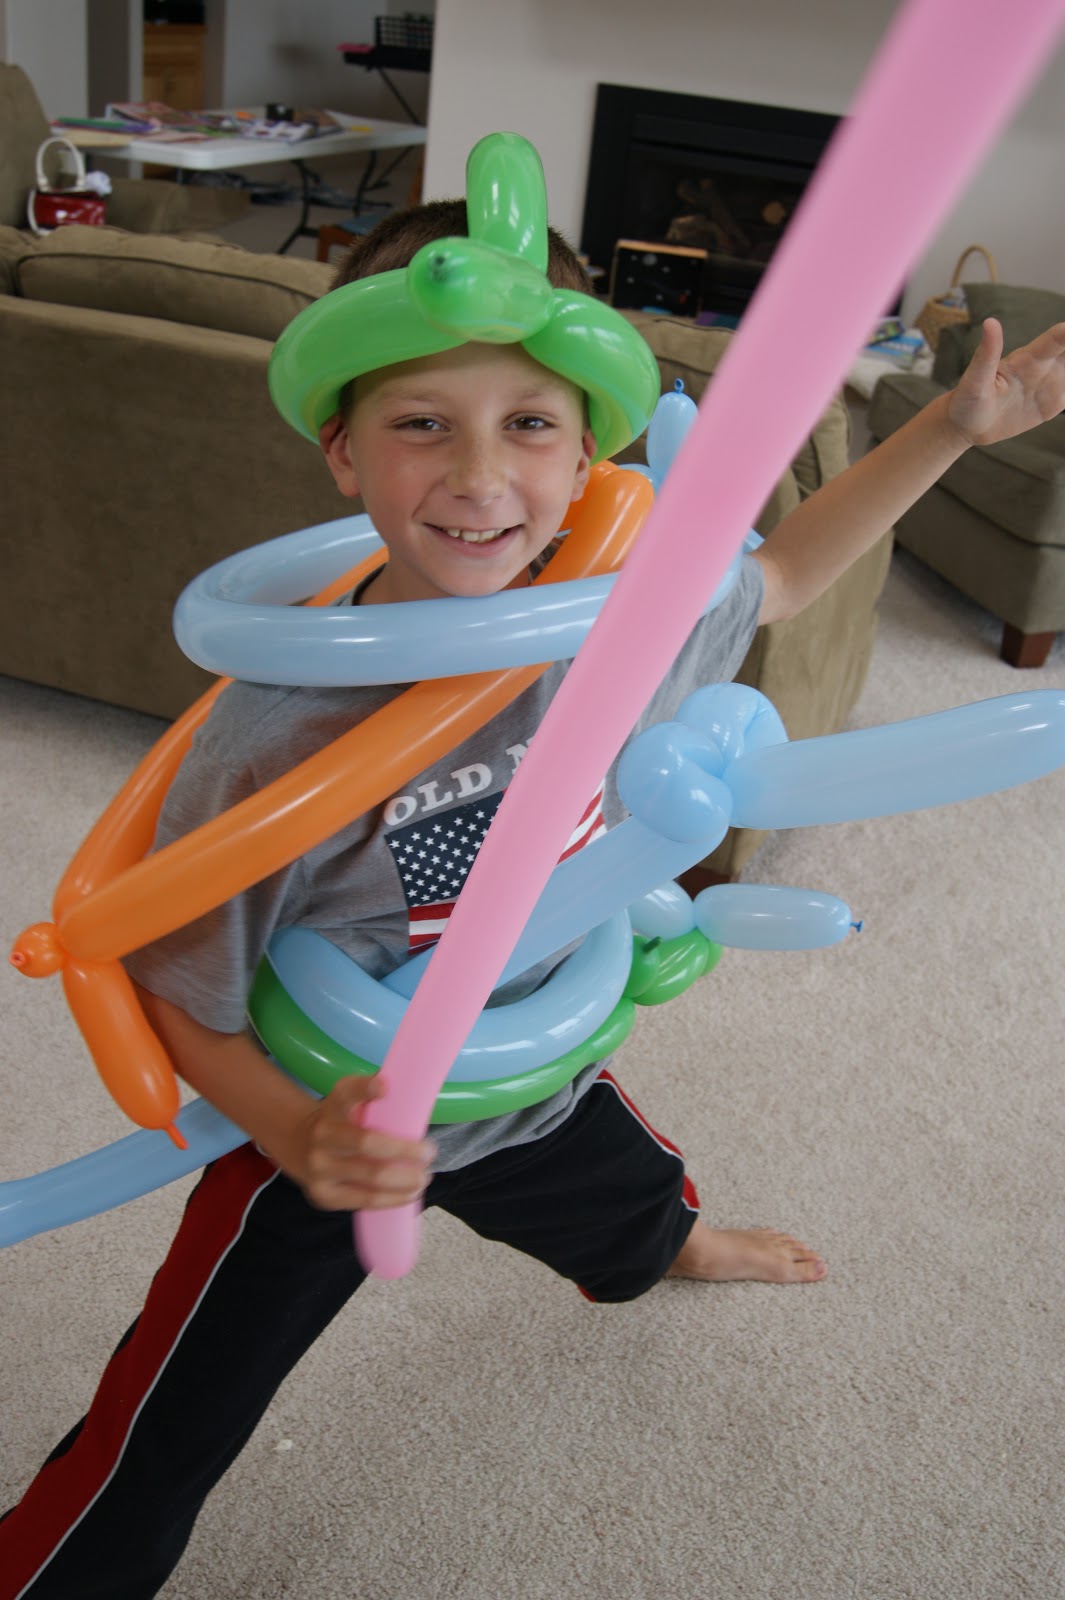
(My son specifically asked that I posted this picture of him with his twisty balloon battle gear!)
To see more of our twisty balloon adventures go here.
Okay, back to our project.
It’s time to get out those pretty colors!
We used a paper plate and a different foam brush for each color.
There are only two rules for this step.
Rule 1) Do not put the same color next to each other.
(You don’t want a green square up against a green triangle.  Mix them up.)
Rule 2)  Paint a little out of the lines onto the tape.
(Yep, you get to go out of the lines!)
Let first coat dry, paint second coat, let dry.
If you are still seeing your line color through the paint, do a third color coat.
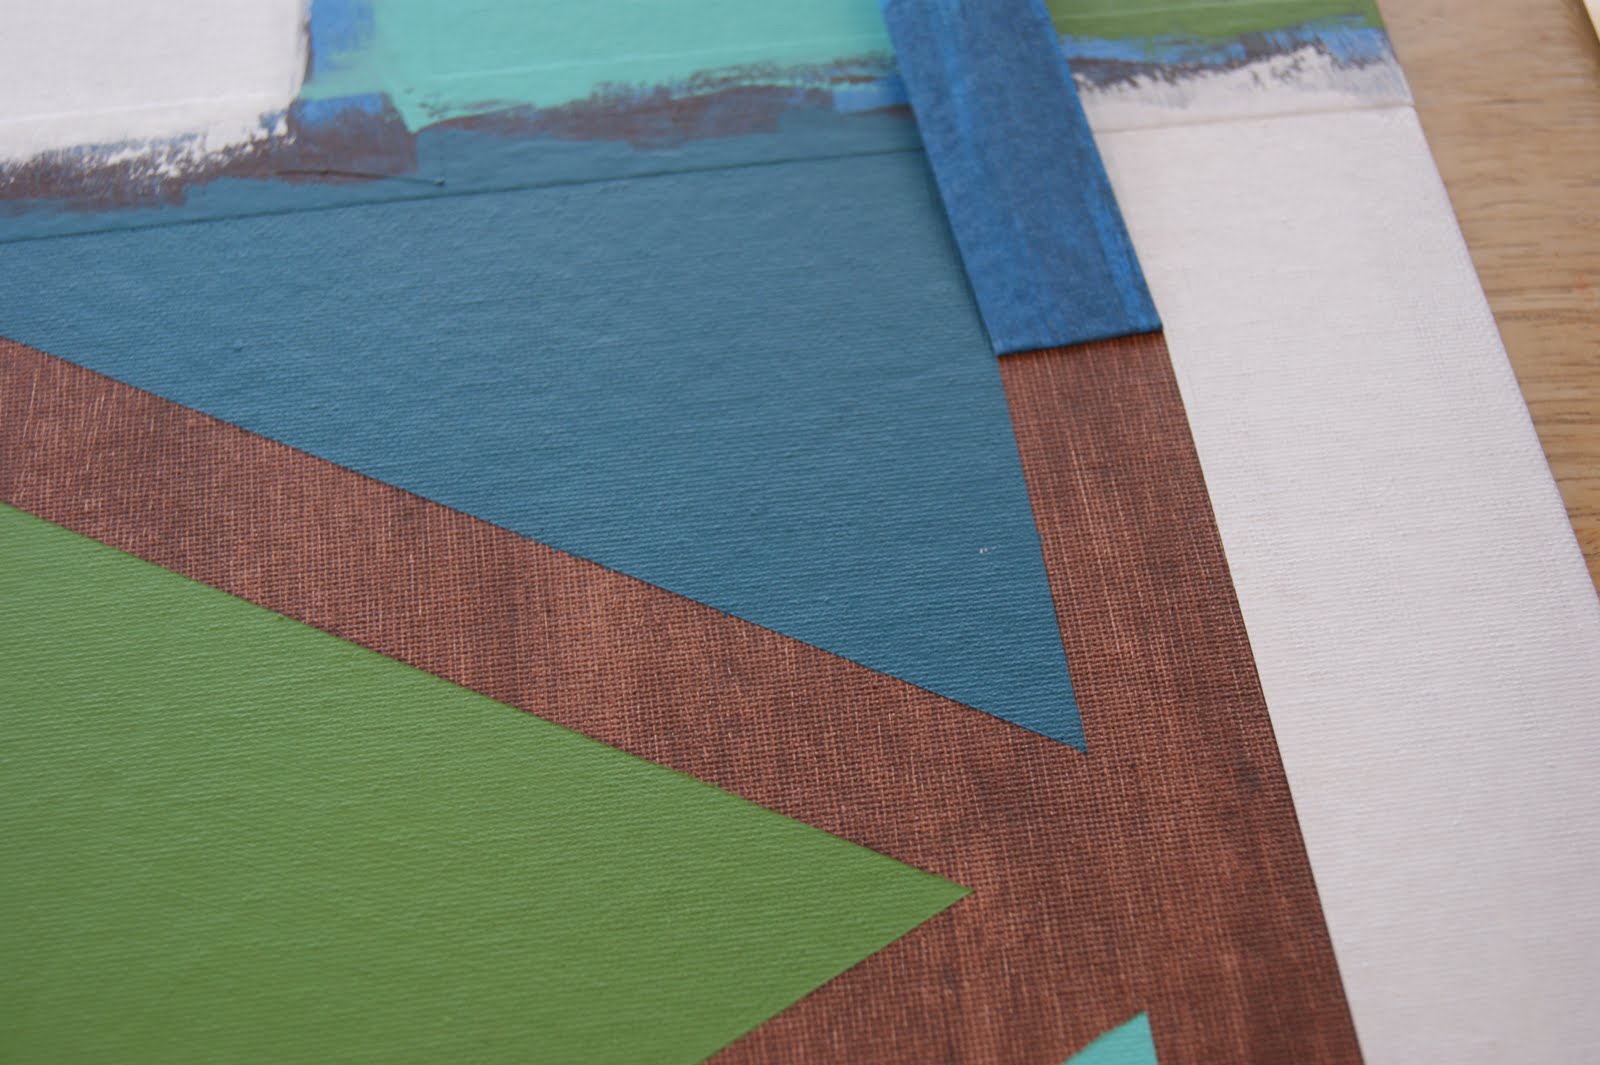
After everything is dry…It’s time!  It’s time!
It’s time to peel off the tape and see your creation!
Look at those perfect lines!
Can you believe it?  It’s so beautiful!
Display it on your mantle for all to see!
You’ll need to start taking orders for family Christmas gifts, now!
__________________________
Just so you don’t think I’m some brillant crafting genius who thought this up myself…
This idea was um…borrowed from here.
My son attended art camp and came home with this creation.
I was completely blown away and had to know how he did this!
He loved teaching me all the steps…I’m just sharing the love!!  Enjoy!
I’d love to have you stop by my blog and say ‘hi’!

 Thanks again for having me, Jennifer!

Elmo Inspires

On a whim, I threw My Life as a Furry Red Monster: What Being Elmo Has Taught Me About Life, Love and Laughing Out Loud by Kevin Clash into my library bag at the same time as I picked up these wonderful books.

While this book may not be in the same literary category as the others, it was a worthwhile read. It was quite inspiring to read how Kevin Clash’s parents nurtured his creativity and encouraged his passion. Very easily they could have chosen a different route when their son expressed the desire to become a professional puppeteer.

The quote below was a good reminder for me to get off the computer and create something with my kids.

“There’s a certain sweet magic you feel when you sit down and create something with a child, whether it’s a masterpiece in watercolors or pasta shapes glued to a paper plate. And remember, it doesn’t matter if you haven’t held a crayon in decades or if you don’t remember how to fold a paper airplane or if you can’t draw hands or horses or rocket ships. In the eyes of a child, your artistic talents are supreme. It’s not what you create – it is simply the fact that you are helping that child celebrate the joy of creativity.”

Inspired by this quote, the four of us sat down and made paper bag puppets.

Though a simple craft, it was a tremendous amount of fun.

We spent an hour laughing, sharing stories, and enjoying one another. The boys eagerly filled me in on all the intricacies of the Batman series while making their superhero puppets.

 Here are the final products.

Alex created Robin and Two Face while Caroline enjoyed using tons of glue.

When Andrew announced he was going to make a half Batman and half Joker puppet my 37 year old brain automatically thought he would draw each half of the characters vertically. I was fascinated to watch him create his half and half character horizontally.

Supermom was my creation and I’d have to say I’m quite proud of her. I wouldn’t be surprised if Angelina Jolie’s people wrote to my people thanking me for the likeness.

My boys were less than impressed with Supermoms’ weapon which indicates they must not be familiar with the powers of my purse. McGuyver and I could go head to head in any episode requiring us to keep a two year old entertained during a license renewal at the DMV.

What’s the last creative thing you did with your kids?

Making Todays Creative Blog

Chair Redo – Guest Post By Kelly

My sister Kelly has graciously agreed to guest post today about her furniture redo. She is our family traveler, a mighty fierce businesswoman, and always up for fun. Kelly is slowly adjusting to Chicago winters by taking extended tropical vacations.

Aunt Kelly & Caroline at our sister Amanda’s wedding

 Hi, I’m Jennifer’s sister Kelly. I am thrilled to write my first ever blog post and share with you my little bit of creativity. To set things straight, Jennifer is the creative one, I didn’t inherit 1/10th of her DIY, artistic abilities. However, when you are trying to find ways to not constantly spend (bleed!) money, but improve your house at the same time, you have to get creative.

I inherited this Adirondack chair a couple of years ago and it has just sat on my patio for the last couple of years.
I was ready to throw it out and go purchase new furniture, however, given that I live in Chicago and we frankly don’t have that long of a summer to use outdoor furniture, I decided to give it a shot to see if I could re-purpose it.

  1. I sanded all of the old paint chips off the chair just using sandpaper sheets
  2. I decided to use some left over blue and purple paint samples I had laying around from another project.  I had great aspirations of painting lots of different stripes, but then realized paint samples just don’t really contain all that much paint!
Paint Samples & First Coat of Paint

I let the first coat dry overnight and then painted a second coat which actually ended up being a different color (hey, I ran out of the first sample, I was trying not to spend much money!)

  1. The final step was to add a coat of polyurethane to seal the paint and hope that maybe it will survive one Chicago winter

The only money I spent was for the container of polyurethane which was about $8.  A new Adirondack chair costs well over $100, so I feel pretty good about my DIY project.

Job well done Kelly! I am so impressed that you started and finished a project in one weekend. Unheard of around here.

Have you salvaged any old furniture like this?

CARS Bingo & Party

When Alex turned 5 four years ago he requested a CARS party.

It was tons of fun and fairly easy to put together.

Since it was a race car party we needed a race track cake. The track is made of black sugar crystals while the side boards are cardboard. We made the “start” and “finish” signs and placed some of his hot wheels on the cake.

Race Car Birthday Cake

The first activity of the party was to take some Crayola Air-Dry Clay and use it to form their own race cars. This activity didn’t turn out as well as I would have liked. Some of the kids were not satisfied with their creations and complained since it didn’t look like Lightning McQueen.

While the clay didn’t go over so well, the bean bag toss was a huge hit. We took a large piece of wood, cut 5 holes in them, and modged podged some large CARS stickers on with various point values underneath. HUGE HIT with the 5 year old crowd.

Creating Cars from Air-Dry Clay
Bean Bag Toss

Another favorite outdoor activity was “The Big Race.” Alex and I decorated 2 diaper boxes and turned them into cars. Alex put race numbers on them as well as headlights and wheels. Two at at a time the kids raced around the yard usually laughing the entire time. The plastic helmets I bought added to the excitement.

“The Big Race”
Little Brother wants to play too

After running around the backyard the kids were ready for an inside activity. I made the CARS Bingo cards, laminated them, and created call cards. I went a little over board and created 15 individual cards. All of the kids loved the bingo game and played several rounds.

CARS Bingo Game
It’s a Printable!

Would you like a copy of the CARS BINGO game?

Please go here & print a copy.

Please consider becoming a follower of Big D and Me if you decide to download the game

Having difficulty downloading? Contact me and I’ll email you a copy.

Todays Creative BlogTuesday To Do Party A Crafty Soiree Weekend Bloggy Reading

McClippies – I’m in Love

I have to admit when I first found out I was having a girl I thought…I can’t do girl. I know boys – Legos, Star Wars, wrestling. Then Caroline came along and eased my fears, at least for now. Thankfully, she enjoys all those things but is girly as well. She wears a super hero cape but insists it has a coordinating hair bow.

I can’t french braid, put hair up in a twist, or even put in pig tails. Although to be honest, I haven’t needed these skills yet since Caroline has very thin but extremely curly hair. So far, spraying it with water, brushing it, and fluffling it in the morning has worked.

Caroline likes to have bows in her hair but they rarely stay in due to her thin hair. Through etsy.com I found McClippies and decided to take a chance on their bows. I ordered them and have been thrilled with them. They stay in Caroline’s hair and are beyond precious.


Go ahead and check them out if you are in need of some adorable hair products.

I bought four clippies but wish we had several more. You can see the clippies Caroline has below.

Aren’t they adorable?

Go ahead and find some clippies for that special little lady in your life 🙂

Pitching a Tent

Our house is where bed linens go to die.

It is beyond ridiculous. Enter my closet and you will find an abundance of old comforters, worn sheets, mismatched pillowcases, and scratchy throws. We could probably open a homeless shelter in our backyard if we so desired. We don’t.

Actually we have more sheets than all the other linens combined. We have inherited sheets from our parents, been given sheets as a gift, and received my sisters’ old college sheets.

I choose to ignore any subtle hint they are sending about the state of the bedding in my house.

The sheets leave our house at a very slow rate. If they ever escape it was via the Goodwill box so we have a large stack of sheets in my closet. Stack might be a nice term to describe the linen mess. It is actually a huge pile of sheets thrown every which way. I believe being able to see your closet floor is highly over rated. Technically, I think the experts call it protecting your carpet. After all, I do have children pooping in my closet.

After reading about Fort Fridays on All About Boys I was inspired to make good use of the old sheets and create a massive tent for the kids. The size of the previous tents constructed have been restricted to the size of the sheet, often leading to yelling and complaining, “He pulled the tent down!”  Factor in space taken up for chairs to hold the tent up and the actual sitting space is quite limited.

So….I started with 1 king top sheet, 1 queen top sheet, and 3 pillow cases.

I sewed them together on my machine in a haphazard fashion refusing to pin anything. It took, ten minutes at the most.

The result was a massive section of material roughly 10 feet x 25 feet. I could be exaggerrating here. I am just taking a guess. Put a queen sheet and a king sheet together and you will have the exact measurements.

The pillow cases spaced out created nice entry points into the tent.

When I peeked into the tent I saw this – Alex reading to Caroline while she sat quietly and listened. I am now putting him in charge of nap time.

The boys have requested I add another sheet onto the tent. I will certainly comply if it means more time pretending and less time asking to play the computer.

Any tents in your house this summer?

Photobucket Weekend Bloggy Reading

Rainbow Vanilla Pops

I first saw the idea of pudding pops here and decided it would be a fun project for the kids

Items you need: food coloring, plastic spoons, instant vanilla pudding mix and milk (not shown), and small plastic cups (not shown)

Prepare the vanilla pudding according to directions

Use food coloring to change the pudding into desired colors

Watch out for little hands who are “helping”

Fill the plastic cups with various colored pudding amounts

Argue constantly that your brother is getting more of one color than you

Place a plastic spoon in the cup and place in freezer

Enjoy your frozen treat after a rough day of playing with water balloons

Are you making any fun summer treats?

Piano Week

Andrew & Alex started piano lessons last week. In an attempt to add to their excitement, we had PIANO WEEK at our house.

What might you ask is Piano Week?

Well, it’s just a week of activities I thought up or found which dealt with music. This was an attempt to give a little structure to our summer days. The focus being on little.

Here’s PIANO WEEK:

Visited: a piano store and received a tour by a very enthusiastic employee

Created: Alex created a power point about John Williams while Andrew made a poster. I originally thought they would choose Beethoven or Mozart but once we stumbled upon John Williams there was no turning back. One morning we spent over an hour watching him conduct on You Tube.

Read Books: 1. Beethoven – A Value Tales book 2. Duke Ellington by Andrea Davis Pinkney  3. Ludwig van Beethoven by Eric Summerer  4. Keyboards by Wendy Lynch

Made: Thumb pianos – directions found here

Listened: to a Mixed Classical CD from Target in the car all week

Food: We ate SHARP cheese, ate BACHli (I’ll be honest – Derek and I are the only ones who ate the broccoli), talked about fish SCALES while we ate fish sticks, and planned to make cinnamon FLATbread but never got around to it.

We also made dessert PIANOS compliments of Alex. We used ice cream bars but white Kit Kats bars would make prefect piano keys.

Movies: We watched the movie Beethoven with Charles Grodin and Bonnie Hunt. Yes I know it has nothing to do with music but the kids loved it.

We capped off the week with a trip to eat ice cream at Braum’s (BRAHM). I wanted to finish up the week at a piano bar but Derek thought otherwise.

We had some LOWS and HIGHs during piano week but overall it was enjoyable. The boys have enthusiastically practiced piano everyday since their first lesson and can’t wait to find out what this week’s activities will focus on.

What fun things are you doing this summer?


Photobucket
Todays Creative Blog