Elsa for Halloween…A DIY Costume

*My daughter wore this costume for Halloween 2014 but I am just now getting around to sharing it now – complete blogger fail*

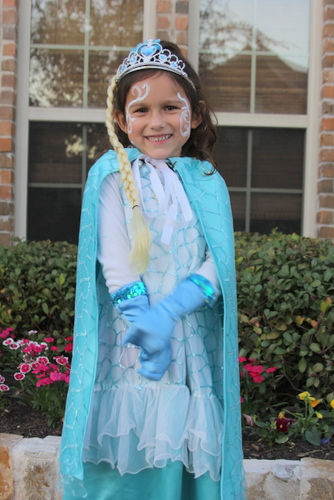
Like practically every other little girl in 2014, my 5 year old wanted to be Elsa for Halloween. I could have bought a costume but we kind of have a tradition that Mom makes your costume. As long as I can get away with it I’m going to stick to that plan.

IMG_8084

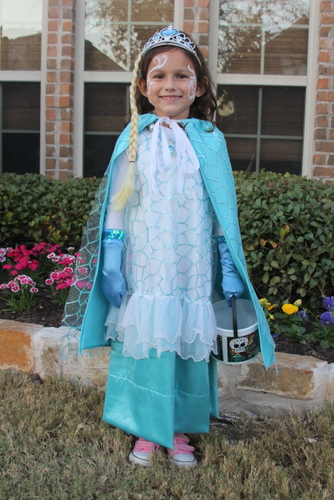
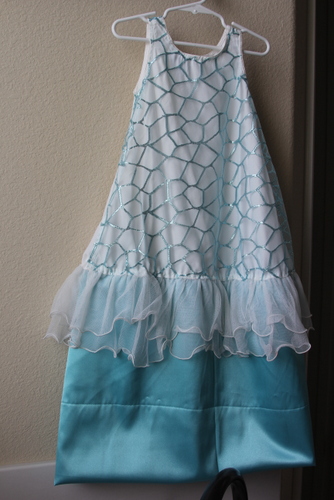
Since my sewing skills stink I knew making a dress from scratch wasn’t going to happen. I needed to find a dress that already fit Caroline and add to that. I found a completely white dress that had been given to us, discussed the design with Caroline, took a trip with her to the fabric store, and just jumped in to making it.

IMG_7506

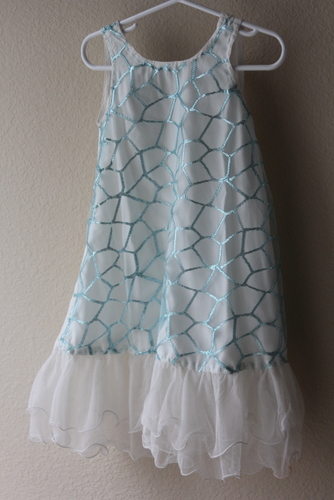
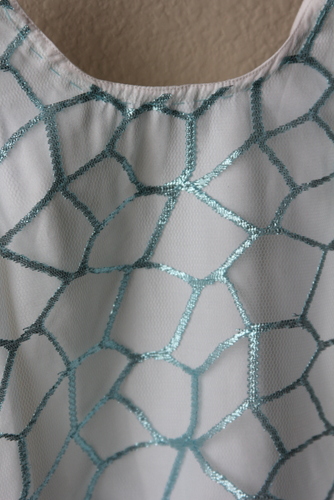
Caroline picked out this blue sequined overlay (is that what this is called?) so I hand stitched it onto the white dress.

IMG_7511

At this point the dress was too short for Caroline so I needed to add some length with the blue satin (aka old bridesmaid standard fabric).  I have no idea why there is a seam in the middle of the dress.

IMG_7514

IMG_7782

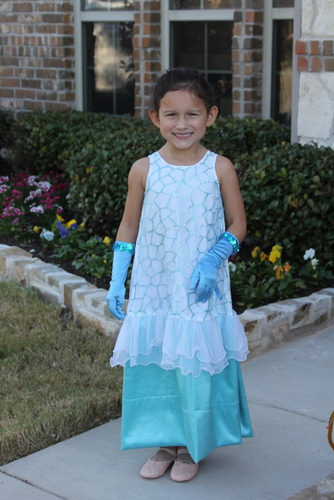
We made a cape which was made of the blue satin and then the blue sequin overlay sewed on top of that.

IMG_7842

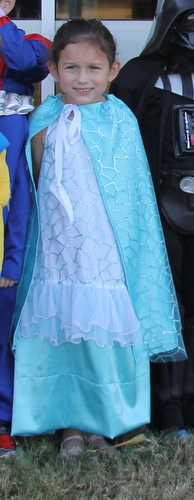
Add a little face paint for Halloween and we have one happy camper princess.

IMG_8086

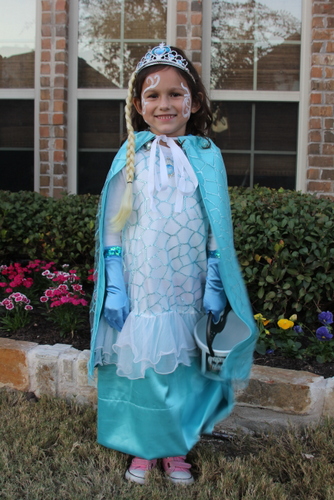
I also bought this accessories set on etsy for Caroline (I can’t find the store now). She wanted all the pieces and I thought why not. On the end of the gloves I added sequins to make them look even more “princessy.” This set blew the budget but I didn’t really care.

il_570xN.643896385_t29e

Blonde Elsa braid with brunette hair = little girls dream

IMG_8093

What are your little ones going to be this year?

Simple Spring (& Summer) Mantle

We recently had company coming over and an empty mantle so I looked around the house for some materials to make something.

I had recently ordered several $5, 8 x 10 canvases for our house from an online company. The pictures were from my brother’s wedding last summer so I thought they would work on the mantle for now until I put them up on the wall at some point.

IMG_9263

I had an old sewing hoop which I covered in green fabric. I then glued on some yellow ric- rac around the edge. Finally I made some fabric flowers using some leftover fabric.

IMG_9272

Searching through my crafting supplies I found some felt and decided to make some small banners with it. I created 3 separate banners but hung them up together.

IMG_9059

IMG_9274

I like the bright colors for spring / summer.

IMG_9273

*On a side note, Sherwin Williams is having a 40% off paint sale this weekend*

**My husband is absolutely delighted with this fact**

***OK, that last thing was a lie. He’s worried, oh so worried.***


A Birthday Crown for Years

I recently made my niece a felt birthday crown.

Happy Birthday Addy!

As you can see below, she loved it.

DSC_0169

Without a doubt, loved it.

Alright, so maybe not a fan of the birthday crowns yet but I know around age 3 she will be rocking that crown for days and days before, during, and after her birthday.

The really cool thing about this crown is that the number in front is interchangable. So if I really wanted I could make her numbers up through to about age 34 and she’d have to wear it because I would be the crazy old aunt who insists on a picture every year of her in her crown. Thankfully for Addy I only made numbers up through ten.

I followed this tutorial to make the crown.

I first used their crown template and cut out two crowns in the same felt color.

IMG_2493

I sewed the pieces together by hand. Not because it was a point of pride but because I sewed all the parts of this crown while waiting at tennis lessons, swim lessons, piano lessons, and in the school car pool line.

IMG_2496

After finishing the main part of the crown, I moved onto the felt numbers. For most of the numbers I just eyeballed them when cutting out the felt.

IMG_2497

IMG_2498

IMG_2500

Since the numbers attach to the crown with velcro, I used this fabric fusion velcro on the back of the numbers and one piece placed in the center of the crown. This velcro is so easy to use because you just iron it into place.

IMG_2504

The final step was to sew the elastic into place. The tutorial I followed used a ribbon to hold the crown together but I thought the elastic would stay on better.

IMG_2505

As a final step in sizing I made sure it would fit my 4 year old who was more than happy to model for me.

IMG_2530-001

Crown are important in a girls life dear little Addy – hope you enjoy your birthday crown for years to come!

Wonder Woman Costume

This year for Halloween Caroline has decided to dress up as Wonder Woman.

I was all for this costume choice and eagerly jumped at the chance to “make” her costume.

First, I researched googled Wonder Woman and came up with Linda Carter.

(As a side note, I was convinced when I was younger that my aunt had played Wonder Woman – she looked exactly like her).

Those costume designers must have really hated Linda since those blue shorts, in my opinion, could not be more unflattering.

With that in mind, we added a bit more fabric for my little WW.

I know.

A-DOR-A-BLE!

Red shirt – consignment store – $2

Blue skort – Goodwill – $1.99 (new with tags on it)

Red boots – consignment store – $6 , then spent $4 on spray paint to make them red

Crown & cuffs – made by me – gold fabric from JoAnn’s – probably $10 – 15.

Gold Lasso which hooks onto her belt- gold string from JoAnn’s – probably $5

Gold Belt – gold material from JoAnn’s- probably $5

Attitude and confidence?

All her own!

My New Favorite Baby Gift

My new favorite baby gift to give is the One Line a Day Memory Book.

The concept is so simple and in the same lines with journaling & scrapbooking but IT’s DOABLE for everyone.

The idea behind the book is that you have 6 lines for each day of the year. The brillant part of the book is that it lists 5 years on one page. So you get to see what your little one or yourself was doing on January 1st for 5 years. Just think of all the changes you will see this way.

I bought each of my children their own book two months ago and both my husband and I have been faithful to make sure there is something written for each day.

Sometimes we write how their school day went, which friend they talked a lot about, games that they played at home, what they ate or refused for dinner, favorite books, funny stories they told us – really anything is open for an entry.

Here are a few of the examples I have for each of my kiddos:

Alex (10 yrs) – You played “French Resistance Army” with Andrew and Caroline. You each had on a toque and gloves. You all built a trench (made of toy boxes, chairs, and play kitchen furniture) coming out from the tent – loving the Tour de France right now.

Andrew (7 yrs) – Ran errands with Dad & Alex – went to Alex H’s for birthday party and sleepover- at lunch, you said, “Look at me, I can eat like a yak.” And you did.

Caroline (3 yrs) – We play Candy Land almost every day. No matter where you are on the board you always say, “I’m almost winning and you’re almost losing.”

I have enjoyed writing in this book so much that I bought one for my sister for a baby shower present.

To jazz up the gift a little, I decorated a little bag for the book to go in.

I used a blue bag that a pair of sheets had come in and some pink fabric.

I cut the side of the bag since I need to be able to put the bag on my sewing machine.

Cut out a letter “C” (initial of her last name) out of the pink fabric.

I sewed the “C” onto the bag and added a little decorative trim.

Hopefully my sister will enjoy this book as much as I have – Although I have a feeling she might be recording sleep durations and blow outs in the beginning 🙂

A Sewing Success…Barely

I had to make Caroline a new nap mat for school since Sophie (our dog) was kind enough to destroy the one we’ve had for the last 8 years.

No, I didn’t have to buy one but I thought , “I can do that. No problem!”

I am a fool.

An over confident fool who needed to be talked off the ledge several times during the sewing process.

I based my design from this nap mat which would have ended up costing me $64.

So in that instance, I am not a fool.

My nap mat came in right around $33.

Because we couldn’t find any Wonder Woman fabric, Caroline chose these flamingos.

There is no tutorial because I didn’t think many of you would want to rip out stitches and sew parts of the nap mat together that aren’t supposed to be.

(the orange blanket is sewn into one side of the nap mat )

(there is a green foam pad inserted into the nap mat – it can be taken out so that the fabric part of the nap mat can be washed)


I will tell you this, Caroline loves her nap mat, but there has not been one single nap taken on it at school.

I think she just bides her time and plans what she will play with once that unnecessary quiet time is done.


Felt Garland

For my sister’s baby shower I created 2 felt garlands to help spread the colors around the room. It was my first time to create these but it certainly won’t be my last.

Since turquoise and hot pink were the colors of the shower I used those but also added a bit of yellow and white to make it more interesting. All of the felt (except for the turquoise) was the hard felt that is not floppy.

I grabbed 3 spice jars from the pantry and traced their tops in order to create circles. I used 3 different size circles for this garland.

I then cut out my circles and sewed them together with my machine. Sewing them together was by far the easiest part of this project.

Here’s one of the garlands at the shower (my sister is preparing for major renovations so hence the paint samples everywhere).

I really loved these and think they would be so fun across a nursery, a play room, or even a classroom. I’ll definitely be making a few more for different occasions.

For the shower’s food flags, go here.

For additional photos of the shower, go here.


Yeehaw!

Howdy folks!

Living in Texas lends itself to many “dressing western” days at school.

Seeing as I don’t particularly embrace boots and hats we often struggle to come up with an appropriate costume on those days. The boys have never been concerned, often refusing to even wear jeans on those days. Caroline, on the other hand, enjoys her school dress up days so I decided to do my best to outfit her appropriately.

An old dress up hat plus a ribbon was the first part of the ensemble.

Next I made her a skirt using the circle skirt tutorial from MADE.

Caroline and I wandered around the fabric store looking for some appropriate fabric. She refused the horse pattern (thank goodness!) and decided on this flower pattern.

To make this skirt, you have to make a quick pattern and then use it to cut out a circle of fabric. From there you adhere the elastic. Sewing on the elastic was the most difficult part for me though it won’t deter me from making another skirt.

The final piece of her outfit was a $3 shirt from a consignment shop.

Caroline is currently loving the book, Cindy Ellen, which is Cinderella with a western twist. She took this book to school to share saying, “I’m a cowgirl like Cindy Ellen.”

And no, she is not wearing boots.

It was 85 degrees that day and boots are not looked upon kindly on the playground.

Plus, this Louisiana momma can only do so much to encourage a Texas style.

A Birthday Skirt

One of my February goals was to make my daughter a skirt or dress.

I settled on a skirt since that seemed to be an easier project.

Half the coverage, half the work, right?

I followed the instructions from the sewing blog MADE and I think the skirt turned out fairly well for a first try. I didn’t bother making a tutorial because, “about this, and cut about that much,” didn’t seem like real effective directions.

We added the pink leggings since this outfit would have been a bit chilly to wear to recess without them. She is proudly accessorizing with her school birthday crown (and a pterodactyl).

And what did this sweet munchkin tell me immediately after putting on this skirt which I worked on for over an hour and which made me extremely proud to make?

“Thank you Mommy. I love you. Thank you for working so hard on this for me?”

Nope.

It was…

“Now make me a dress please.”

“I’m 1…2….Free!”

Bedroom Pillows – It’s Love, eh

One of my January goals was to make pillows for my bed.

My biggest hurdle for this project was the fact that I knew I had to change the sewing machine needle before I started this project. Sounds easy but to someone who had never attempted to change the needle I was terrified. I didn’t even look at the manual because I just knew it would be difficult. I bought the fabric to make these pillows way back in September so that was a lot of stalling on my part.

But guess what?

It was easy. I’m talking 10 seconds easy.

So here’s the final look…

In case you don’t know, I’m married to a Canadian and there’s quite a bit of “eh” going on around here. I kept asking him, “Doesn’t it need an exclamation point or a question mark?” My husband insisted it wasn’t necessary since, “We use eh for everything.”

Here’s the run down of the pillows:

3 Large Pillows- Annie Selke Fabric – Seema/Oxford Ivory/Raspberry

(Our bedroom wall is the same light blue/gray in these pillows)

2 white pillows  – I bought two king pillowcases – I put them on our wimpy standard pillows and wrapped the remaining fabric in the back – I will need to get the proper king sized pillows for these someday.

2 Pink Swirl PillowsAnnie Selke Fabric – Scramble Raspberry

1 “Love, eh” Burlap Pillow – burlap on front, Annie Selke on the back

I first taped off a section on the burlap and drew my words on with a sharpie.

Next, I went over my letters with black fabric paint.

After humming and hawing for awhile about the next step, I took the extra tape pieces off the sides – in other words, I made a rectangle of tape but didn’t take a picture.

I now had a perfect rectangle shape to follow when I free handed a rectangle with my white embroidery thread. I double the thread so it would be thicker throughout.

Here’s a fuzzy shot of the embroidery thread.

And the final products once again.

Now onto the bedroom lamps!