A Texas History Bow Hunt

Now that school is in session around here let’s talk about ridiculous homework.

Last year my son studied Texas History in 7th grade. It’s not really a topic that thrills him which is surprising because he is such a history buff. Give him US History or World History and he is set. But Texas History for a whole year can be a bit much.

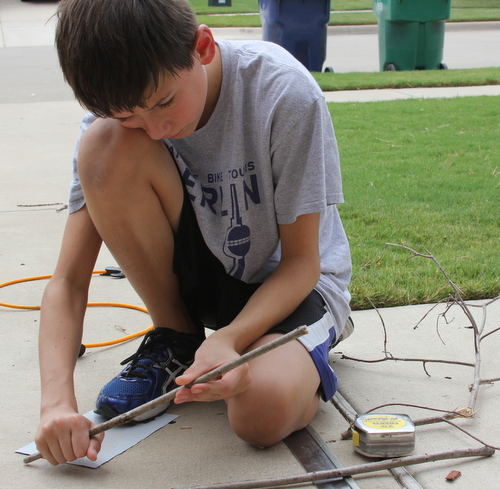
At  some point when studying Texas History one must cover the Indians. When my son got to this part in the curriculum his teacher gave the class the assignment, “How to Make a Bow and Arrow.”

Sounds kind of cool.

IMG_7363

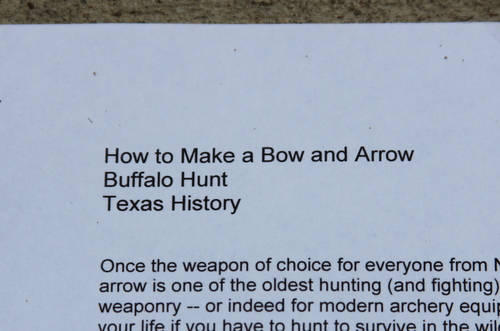
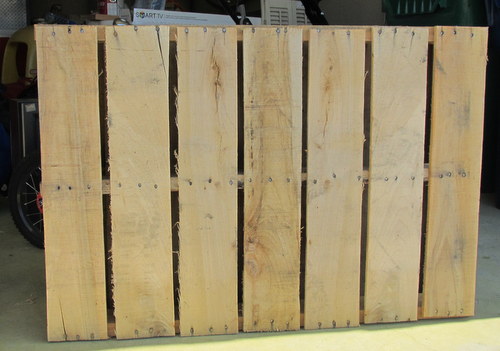
But some of the specifics of this assignment are kind of crazy. Below it says, “Choose a piece of wood for the bow. Find a piece of dry, dead hardwood – oak, hickory, yew, black locust, or teak.”

IMG_7364

Now teak wood is found in Indonesia and Myanmar while there are several types of yew wood some of which are found in Europe, Pacific, Canada, China, Japan, Florida, and the Himalayas.

What the assignment should have said was find a piece of wood at your neighborhood park.

We did just that.

IMG_7361

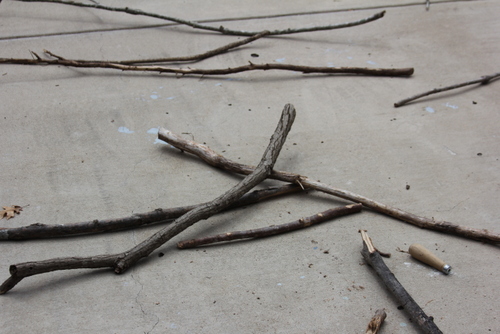
The directions above say that the wood should be free of knots, twists, or limbs.

IMG_7360

IMG_7362

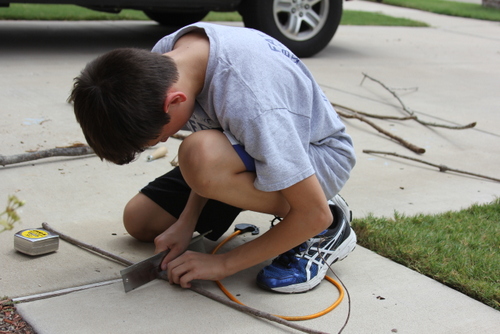
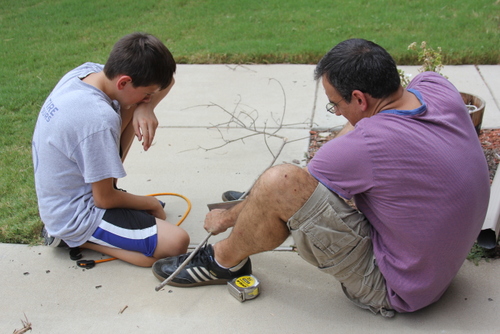
The next step in bow making comes in selecting a bow string.

IMG_7366

IMG_7366-001

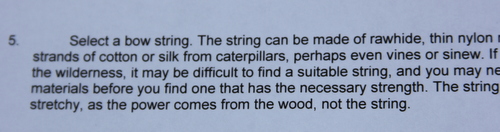
Yep, you read that right. Just go back outside and grab some strands of silk from your caterpillars.

We used string. Good ol’2015 string on our bow and arrow.

IMG_7367

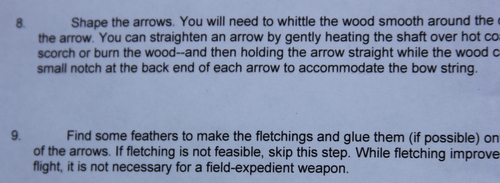
Next you need to make your arrows. “You can straighten the arrow by gently heating the shaft over hot coals – be careful not to scorch or burn the wood.”

I feel like there’s a lawsuit just waiting to happen with this assignment.

We skipped the hot coals part.

IMG_7369

The results…

IMG_7375

IMG_7378

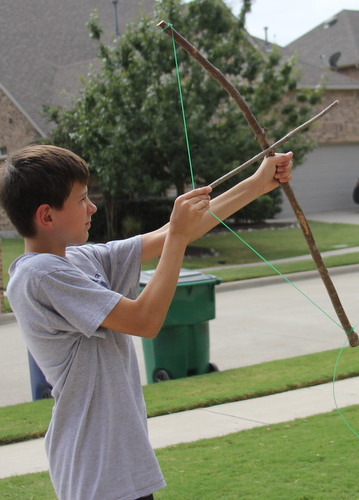
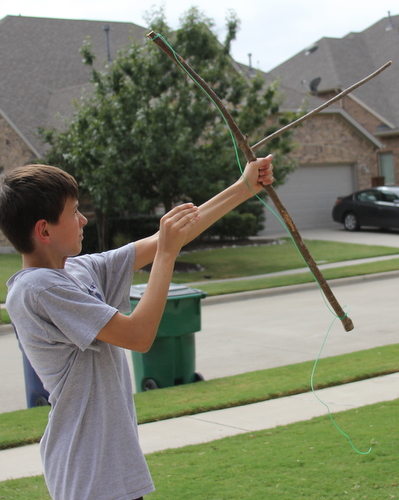
The arrow ended up flying about 5 feet.

At  school the teacher had set up a large paper buffalo on a string. The idea was that the buffalo was pulled back and forth so the kids could try and hit it.

My son did not hit the buffalo with his wooden bow and arrows.

Guess which kids hit the buffalo.

The ones who used PVC pipe for the bow and proper arrows.

Man oh man was my son angry when he found out they got the same 100 that he did for the assignment.

I did have to point out to him that he too kind of broke the rules when building his bow and arrows – no wood from the Himalayas, no hot coals were used, and certainly no caterpillar silk.

Can’t wait for homework in US History this year.

Maybe he’ll get to practice medicine on his brother using only tools that were available during the Civil War or perhaps he’ll get to brew his own beer while studying Prohibition.

Easy Bathroom Shelves

You know when you walk around the house and all of a sudden you can think of nothing else but getting a project done. I actually got one of those kind of projects done last week.

Our master bathroom area has the toilet in a separate little room. Despite this little room being in our bathroom my six year old comes into my bathroom on a daily basis and tries to talk to me through the door while shaking the door handle desperately. When I finally emerge she asks, “What were you doing in there?” Seriously. It seems to be a mystery to her.

Anyway….we were trying to find a way to get some of our bathroom supplies up away from the ground since they are normally stored under our sink area.

I walked past our little room and instantly thought, “We could put shelves up in here!”

So before I could change my mind, the kids and I went off to Home Depot, bought the wood and had them cut the piece in half and bought some shelf brackets (total $42).

I then came home, poured 3 quarts of left over paint (2 light gray and 1 white) in a plastic container and starting painting the little room. The painting part of this project was unnecessary but it makes me happy and it was free.

Here is the end result:

20150803_213919

Sort of looks like a before photo until you  see the before photo and then realize, “Ahhh, yes..the after is better.”

IMG_0732

My boys were very excited to help with this project. While we were walking up and down the aisles of Home Depot I heard my 13 year old tell the 10 year old, “Well when you stain you have to go with the grain.” I mean, seriously, my heart sang when I heard that.

20150803_213952

My husband and our boys sanded the wood and then stained it using a stain we already had at the house.

20150803_213933

So in the course of 2 days we got a project DONE!

Any areas of your house you just want to tackle right now?

Cleanup Hitters of the Fridge

Do you ever notice that moms are the cleanup hitters of the fridge?

Everyone else can open up the fridge, look at all its contents, and declare, “There’s nothing to eat.”

IMG_9060-001

But moms on the other hand, look at the same contents, and think, “There’s enough in here for 2 more meals. I’m not going to the store.”

I am always eating strange meals for Saturday and Sunday lunches.

A few tortilla chips, with some leftover guacamole, some grapes, and some broccoli reheated – sounds like a meal to me!

Some leftover pasta, a tomato, a piece of swiss cheese, and some Italian dressing – sounds like a meal to me!

My boys always look into the fridge on these days and promptly say, “Can we have mac n’cheese?”

What? Don’t you see all of the possibilities when you look in there? More importantly, don’t you see the fact that Mom doesn’t have to go to the grocery store and spend money when all of this is still available to you.

My husband is really on the boys side of things. I see him wander around the kitchen opening the fridge, opening the cabinets, searching up high for….the cooked lasagna I keep on the top pantry shelf? Who knows.

But last Sunday I couldn’t have been more proud of my husband. He opened up that fridge and promptly fixed himself a meal of leftover potatoes mixed with some leftover spaghetti sauce!

Sounds like a meal to me!

Mermaid Shelf using a Pallet

Last time I shared my daughter’s bathroom with you and today I’m sharing the pallet shelving unit my husband made.

IMG_9028When we completed this project 3 years ago pallet projects were all the rage. At the time I was able to go to our local Habitat store and ask if I could have a pallet. They said sure and I got it for free. Nowadays they charge you for them.

I brought the pallet home and asked my husband to make a shelf for Caroline’s bathroom. After shaking his head and possibly rolling his eyes he got to work.

This was the only picture I could find of it in the building stages – a frame was built and then the wooden boards were attached onto it after being sanded.

IMG_2489

We then used scrap wood for the shelves and bought wooden brackets to place underneath the shelves to hold them up. After that I painted on a mermaid using pink paint.

IMG_2517

I then sanded the mermaid and pallets to add a little character to them.

IMG_9030

IMG_9028-001

And voila, the world’s heaviest shelf is made!

A Little Girl Bathroom – Under the Sea

IMG_9065

This is the bathroom that took 3 years to complete – did we do any major repairs? did we take out the tub and sink? Did we redo the floor?

No. No. And no.

We painted, hung a shelf, and made some art.

3 years people. 3 years.

It’s totally my fault, I hit a wall on the project so it just stopped.

Let me explain.

When we started this project my daughter was three and wanted a Little Mermaid themed bathroom. I knew she would quickly grow out of that so I decided on a whimsy ocean theme.

The plan was to make stripes on the back wall alternating between white and light blue.

My sweet husband worked on this for a couple of days.

IMG_2296 When it was finished I liked it but the pencil lines going across the wall really bothered me as did the raised paint lines. I’m normally not so picky but this for some reason really irked me.

As the painting was wrapping up I was laying out random frames we had – soon after I spray painted them bright yellow.

IMG_2332

I used light weight denim material and covered pieces of cardboard which were the sizes of the frames.

IMG_2338

I found some walls decals on etsy and just printed out the pictures from the listing to create an outline of the sea creature I wanted to use.

IMG_2368

IMG_2370

I completed almost all of the art when I came across a problem with the turtle art above – this was the only piece where I used the actual back of the frame to glue the denim to and now the art would not fit back into the frame. I did not have any left over denim fabric since it was left over from another project.

So the project stalled.

For two years.

The stripes stayed and the wall art sat on my bedroom floor.

And there it sat until Christmas time this year and I wanted to get this project -DONE.  I ended up tossing the turtle art and not using him and my husband sanded down the wall and we just put a coat of white paint on the wall. The art wall is white while all the other walls are light blue.

Here’s the final product. I love it.

IMG_9036

IMG_9035

Some of the pieces received a little yellow bow.

IMG_9032

IMG_9033I glued on some yellow rick rack to create jellyfish tentacles and some stripes on the fish.

IMG_9057

Next time, I’ll show you how we (read: my husband) made this mermaid shelving unit.

IMG_9029

And to my husband – Thank you for everything you did to make this bathroom so special for our daughter!


A “Bench” of Personality

The longer I am married the more I have come to realize that I am the big thinker in the marriage. Let’s build a house! Let’s go to Disney World! Let’s paint the piano!

All of these big ideas stress out my detailed oriented thinking husband. I never have a plan of how we are going to accomplish these things, I just always say let’s do it. My husband, ever the detail man, begins to lay down the no’s. I promptly ignore him and say we can do it! Whatever it is, I have faith in us. Whatever it is, he sees the obstacles. He’s an engineer and it shows.

I’m fairly sure it’s what makes our marriage work almost 18 years later. One of us is the gas, one of us is the brakes. Without my husband, I would surely be in debt, live in a fully decked out house, and keep up with the Jones’. (OK, I’m actually not that bad – I’m the one who cut cable to cut costs.) Without me, my husband would surely live in a house with only a mattress and a tv, drive a car from the early 90’s, and die as a lonely miser who would have prepaid his own funeral at cost. (Ok, he’s actually not that bad either – he would live with a mattress, tv, cable, and pizza delivery).

My very long and convoluted point being….I wanted to paint the piano.

“Come on…let’s paint the piano!”

My husband has not been impressed each time I have mentioned this for the past two years.

IMG_6989

In an effort to reach those 18 years of marriage and then move onto 19 I decided this was one of those things that I am just going to let drop. It’s really not that important and is a huge task.

IMG_6988

So instead we recovered the piano bench in 10 minutes on one of the snow days.

IMG_9019

Here’s how the project went down:

Me – “Here’s a piece of fabric to cover the piano bench with.”

My husband – “Is it big enough? Are we going to staple it in? Do we need to take the leather off first? Will we have to replace the hinges?

Me: “I don’t know…let’s just do it.”

IMG_9024

I believe all sides are happy with the result and thrilled that this project has come to an end.

But don’t you worry dear…I’m dreaming up all sorts of projects that you will love.

IMG_9025

Because we can do it!

Happy Birthday

My husband’s birthday is today and I just want to give him a shout out.

He’s really the most caring, loving person I could have ever asked for to spend my life with.

He’s the best dad to our kiddos whether it’s helping with legos, going to Boy Scout meetings, checking math homework, building projects with them, reading aloud thick chapter books, cheering them on at games, playing board games with them, and just loving them no matter what.

We all love you Derek – happy 42nd!

IMG_6096


A Simple & Easy Rug

Due to a rather unfortunate stomach bug that hit our family last year I needed to invest in a new bathroom rug.

I did not want to spend a lot of money because inevitably there will be another bug that will cause several of us to lay on the floor unable to muster the strength required to walk to the bed. Instead we will spend hours on the floor with our pillow and blankets moaning and groaning.

Therefore, we needed a new rug. (Plus the tile gets so darn cold and slippery).

My family and I were wandering the Habitat store one day when I stumbled upon carpet squares for $1.99. We searched through piles and piles of squares to find just the right ones with the pattern I wanted and the quality my husband wanted.

We found 8 tiles that were good so we went home, placed them in a corner of our bedroom, and left them there for 8 months.

I kid you not. That’s sort of our MO around here.

Finally one day we dragged them into the bathroom and started the incredibly tedious and time consuming project of taping them together.

I think it took 15 minutes.

IMG_5190 IMG_5191 IMG_5192

We chose to alternate the carpet squares so that the pattern would be a little more interesting than just straight lines.

IMG_5194 IMG_5195 IMG_5196

A new 4 ft x 8 ft carpet in the bathroom.

I still need to add some glue strips, using a glue run, to the bottom to keep the carpet from moving around.

I’m aiming for 2016 to complete that project.

A Colorful Bedroom Wreath

My name is Jennifer and I am a craft materials hoarder.

IMG_3989

When you are a craft materials hoarder it’s easy to say, “This project didn’t cost me anything.”

At least that’s what I tell my husband.

He is well aware that at some point in the past five years we’ve paid for these materials but he chooses to go along with my “free projects.”

I’m pretty sure we’ve found the key to a successful marriage.

IMG_3936

Not sure where I accumulated all of these materials from but I’m thankful I did.

Wrap a wreath in fabric strips and secure with glue gun.

IMG_3985

Make rosette flowers with fabric scraps.

IMG_3986

Make felt flowers with felt leftovers.

Have a few extra buttons lying around?

Go crazy and glue them on.

IMG_3987

Arrange and rearrange until you get it just right.

IMG_3988

Then use that glue gun very liberally.

IMG_3990

Free decorative wreath for my daughter’s bedroom.

IMG_3989

Score one for craft material hoarders everywhere!

Chicken Wire Frame in the Ol’Bedroomo

Isn’t the title funny?

No? Well as I’m watching this football game I’m finding that I need something to entertain myself.

Actually, truth be told, I’m not even watching the game.

Gotta grab those quiet moments in front of the computer when I can.

IMG_3921

A few months ago I spray painted an old frame that I picked up at a garage sale for $1.

I first spray painted it white and then did little spirts of silver.

Before the silver dried I dragged a cloth over them to move the silver around a bit.

IMG_3922

My husband, the world’s best, then added chicken wire to the frame.

IMG_3923

I love seeing these picture of us up every time I walk by in my bedroom.

Makes me ridiculously happy.

IMG_3924

My 4 year old thought having a picture of Princess Elsa would make me happy as well.

And while that does make me smile, she has got to go.

Princess Elsa that is, not my daughter.

(The best thing to hold onto in life is each other print found here.)