Sunny Vanilla Guest Post

I recently discovered the blog Sunny Vanilla and am extremely glad I did. Jen’s blog is filled with original crafty projects using both fabric and paper. I love her fabric choices and only dream of bring able to sew like her. Some of my favorite projects on Sunny Vanilla are making a book with fingerprints how to sew a father’s day book, her summertime pursecocktail coasters, and how to make  a $7 skirt,  Make sure you check out Jen’s Etsy shop too.

Today Jen has been kind enough to share a craft with us using a material almost everyone has in their house. In fact, I buy four of these each week to quench the thirst of my three growing kids. Intrigued?

Take it away Jen…..

Hey everyone! I’m Jen from Sunny Vanilla and I’ll be hanging out with you all today. A tid bit about me…When I’m not sewing or crafting, I’m swatting mosquitos and sweating buckets over in the Sunshine State. I like to call this place home 😉 I married my HS sweetheart (I know, roll your eyes) and after a long, long, long time, we finally settled down and had a little girl we like to call our nugget. I’m a simple, beachy kind of girl who lives in shorts and flip flops. I think laughter is the best medicine of all, aside for maybe a really good bargain shopping spree. It’s nice “meeting” all of you!

I’ve got a little tutorial for you that I think you’re going to love. It’s simple, super inexpensive, and one that your kids may enjoy doing too! Enjoy!!!

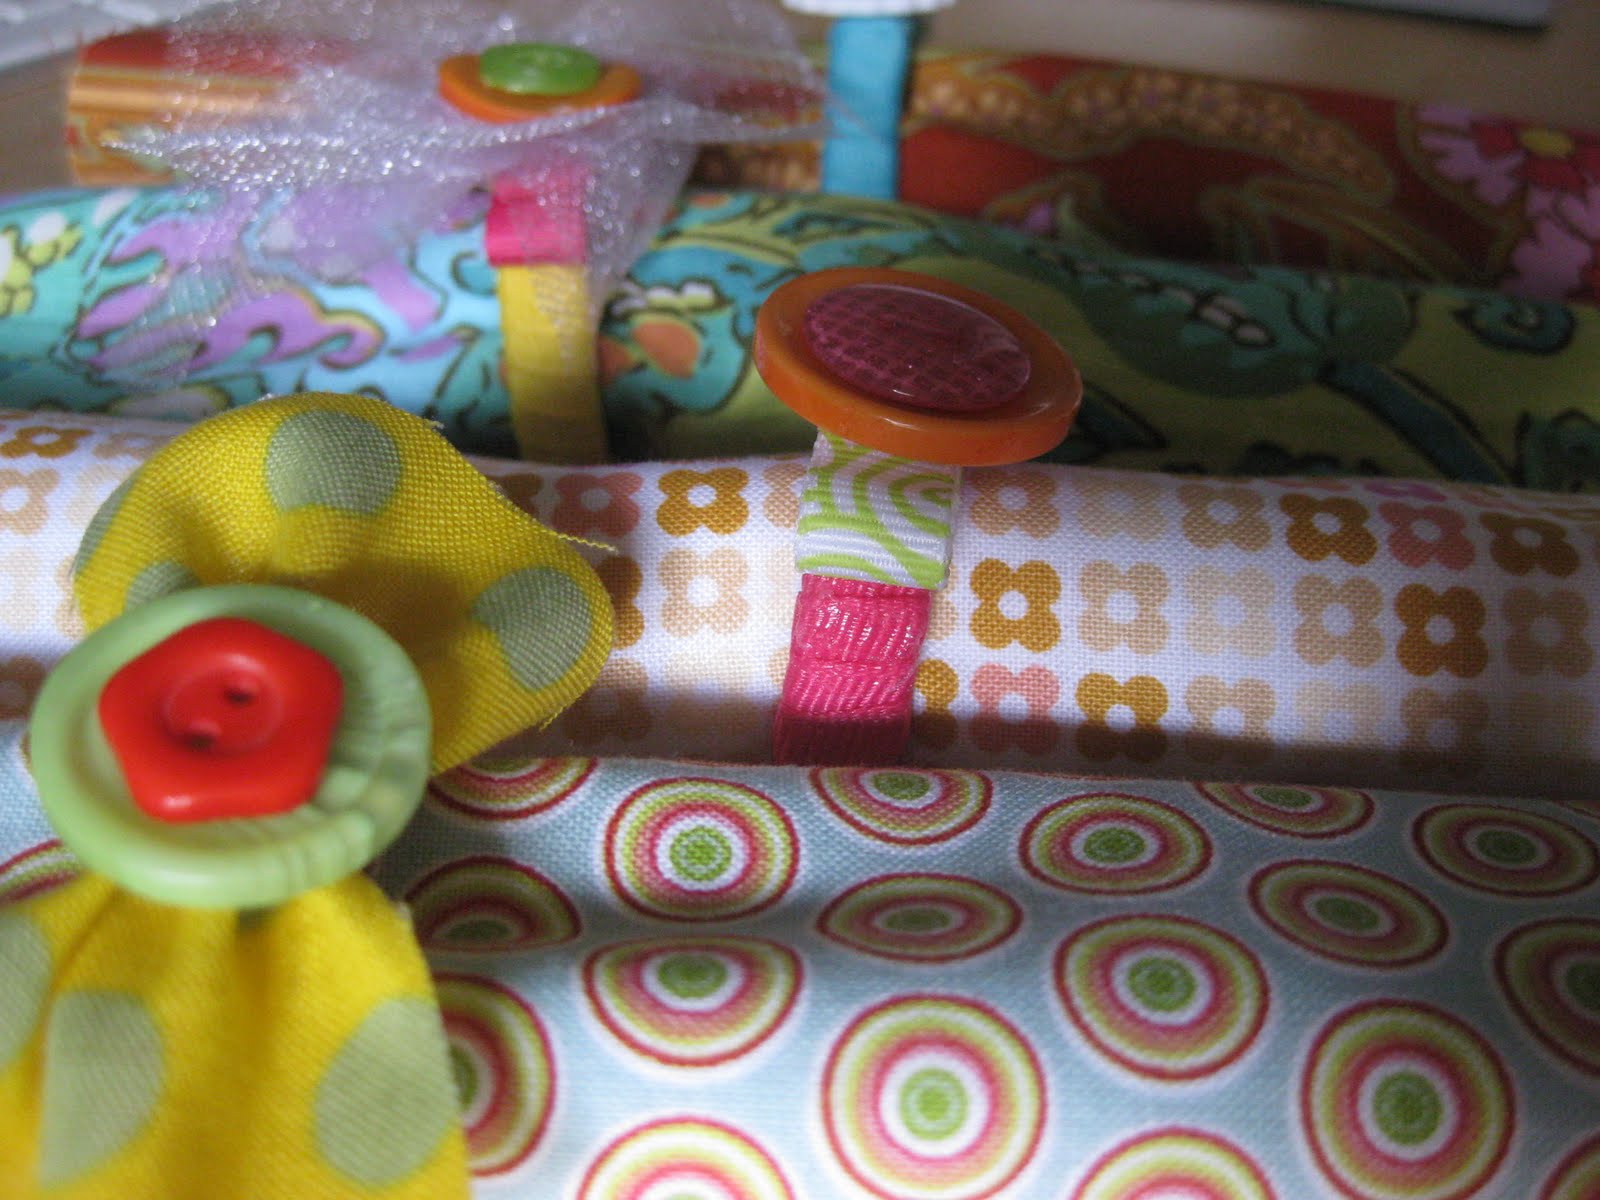
I’m not sure about your family, but we go through milk around here like it’s going out of style.  So naturally we have tons of milk cartons {we really should just put a cow in our backyard}.  Well, I started saving the rings on the top of the carton thinking I could use them for something.  Enter the napkin ring!


To get started with your napkin rings, you will need the following {a glue gun will work too}: 

Glue two milk carton rings together like this.

Cut approximately 28 in. of ribbon.  
Once the glue has dried, add a small dab of glue to the inside of the ring and attach the end of the ribbon there. 

Begin to wrap the ribbon around the ring, making sure to keep it nice and tight.  Overlap as you go.


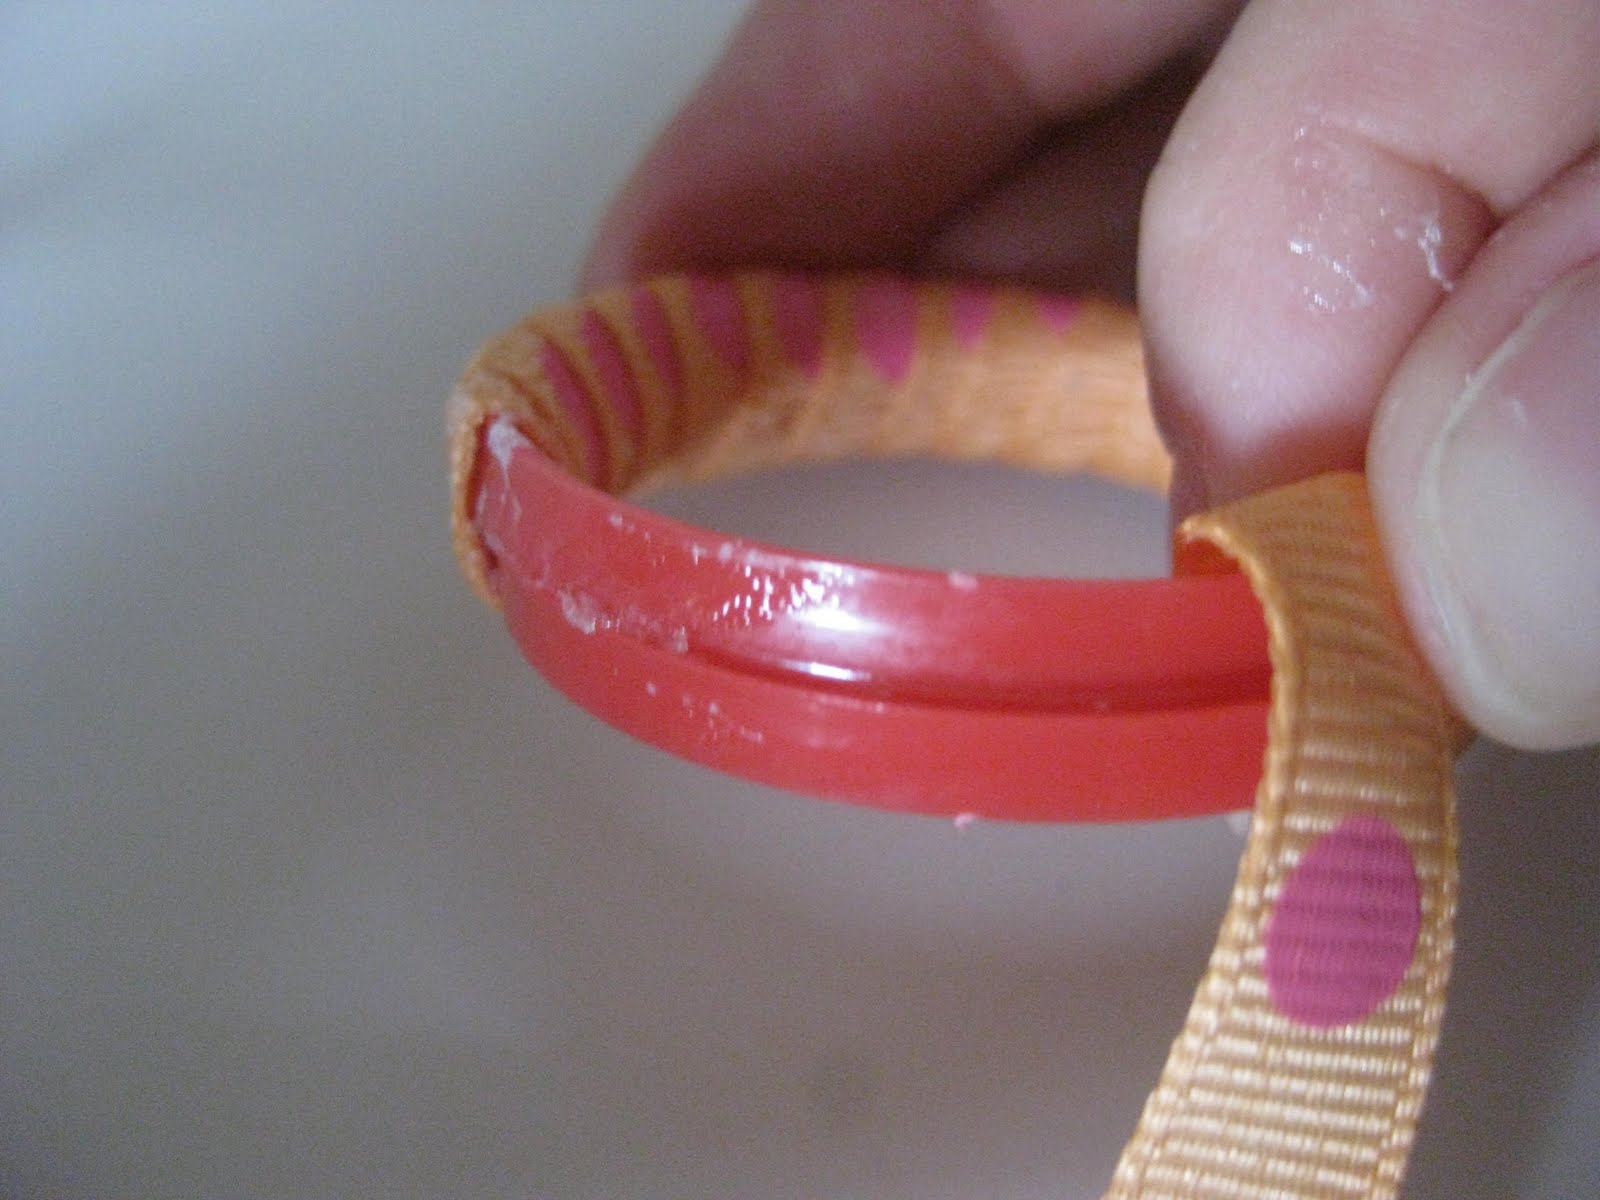
Once you’ve completed the ring, add another small dab of glue to the inside of the ring.  Cut your ribbon and press firmly into the glue.

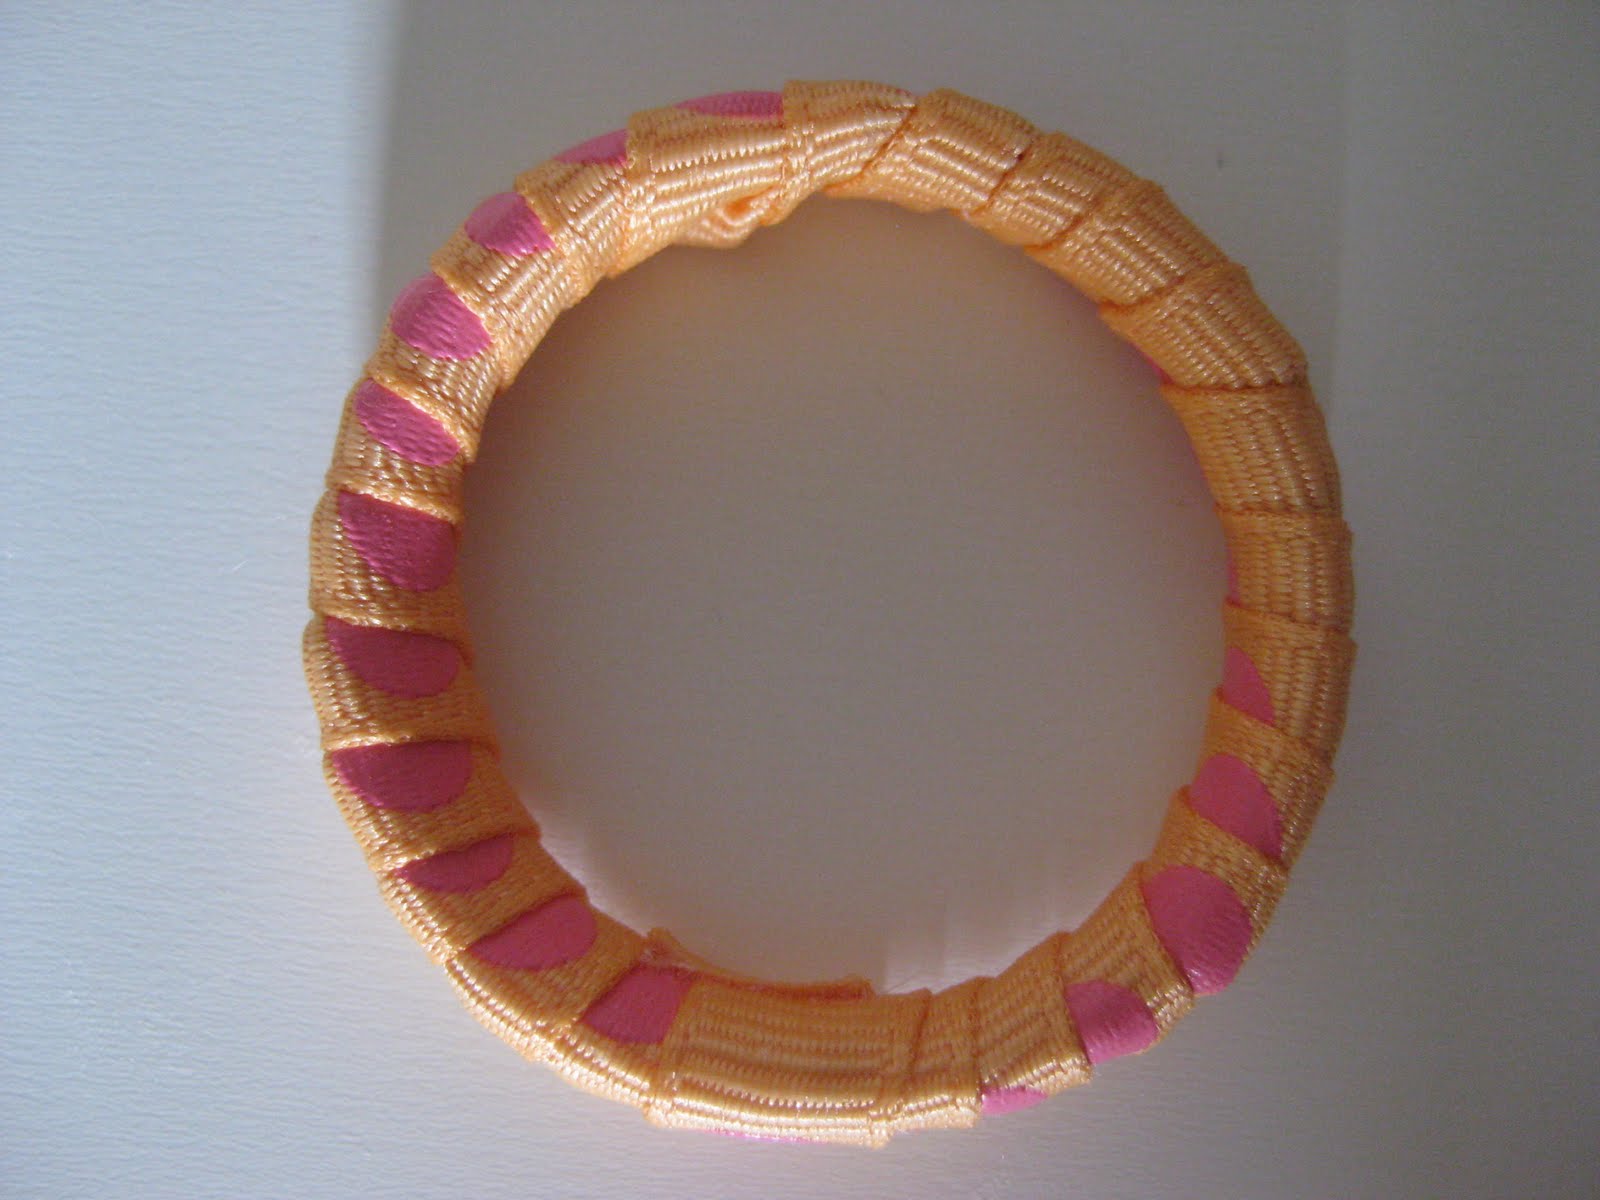
Now you have a napkin ring!  You can leave it alone or embellish it however you’d like.

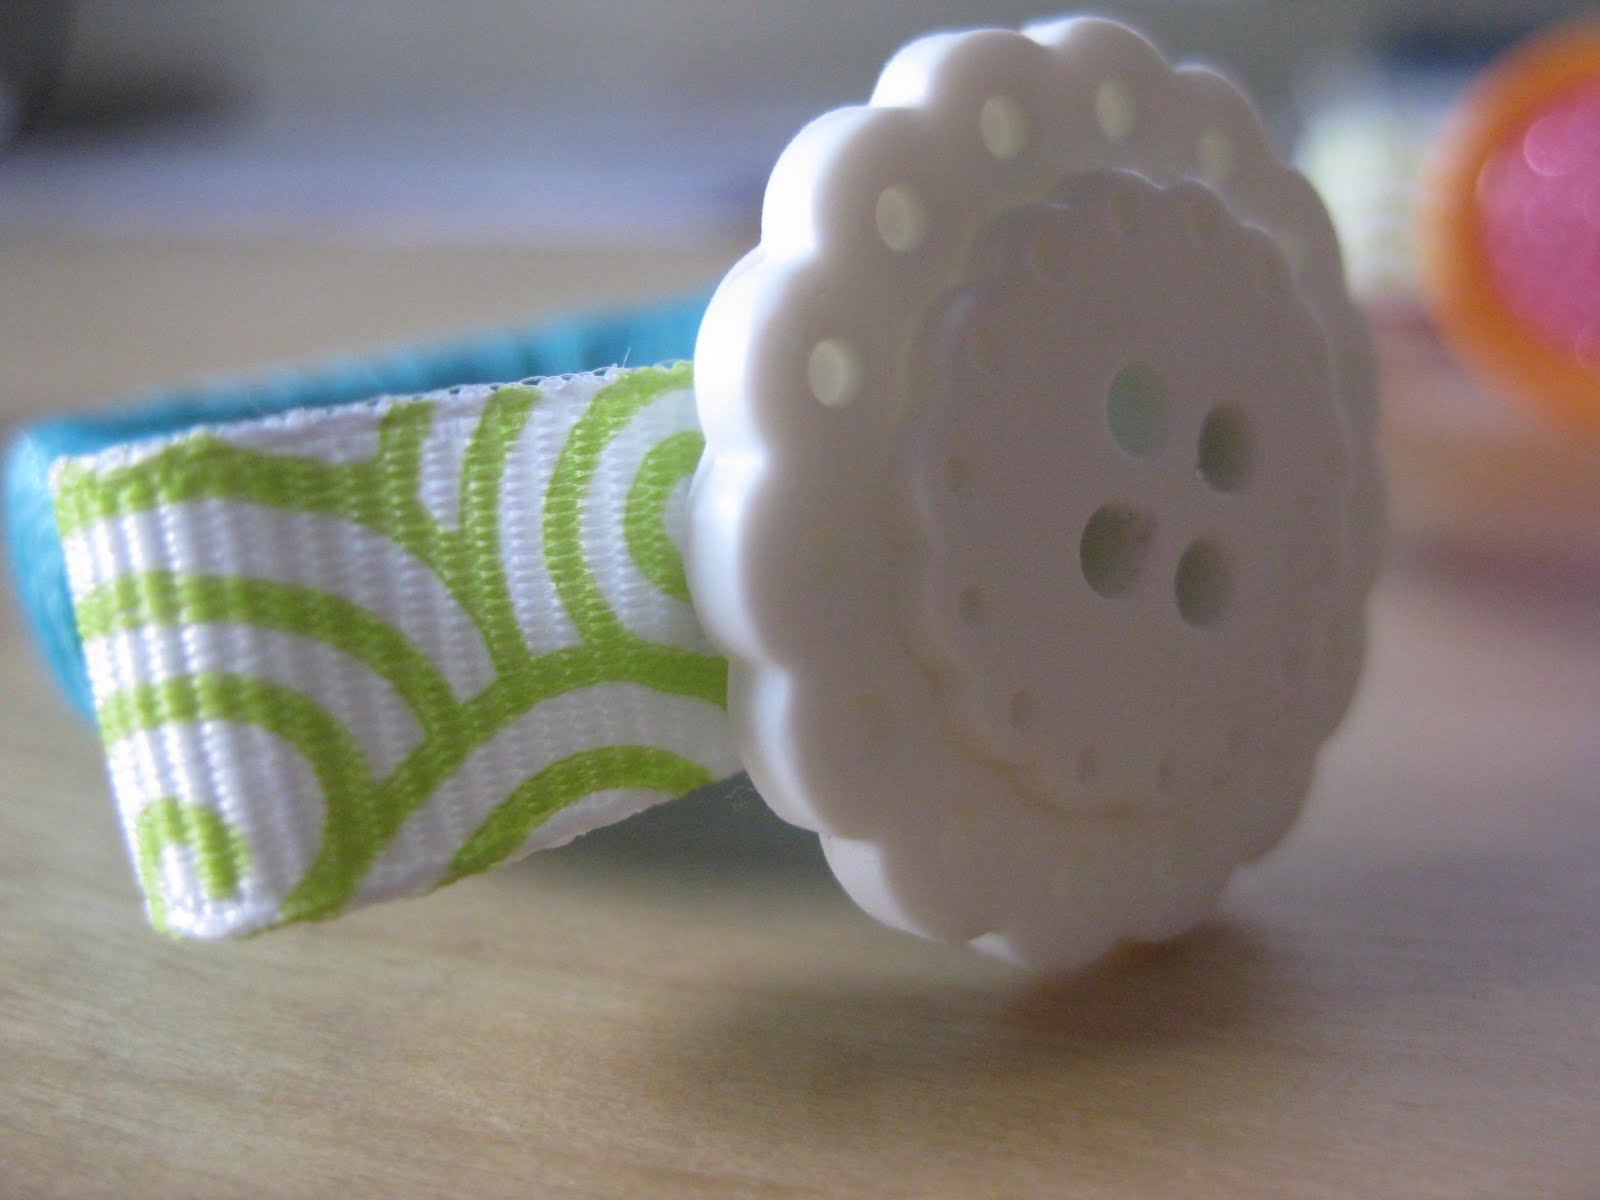
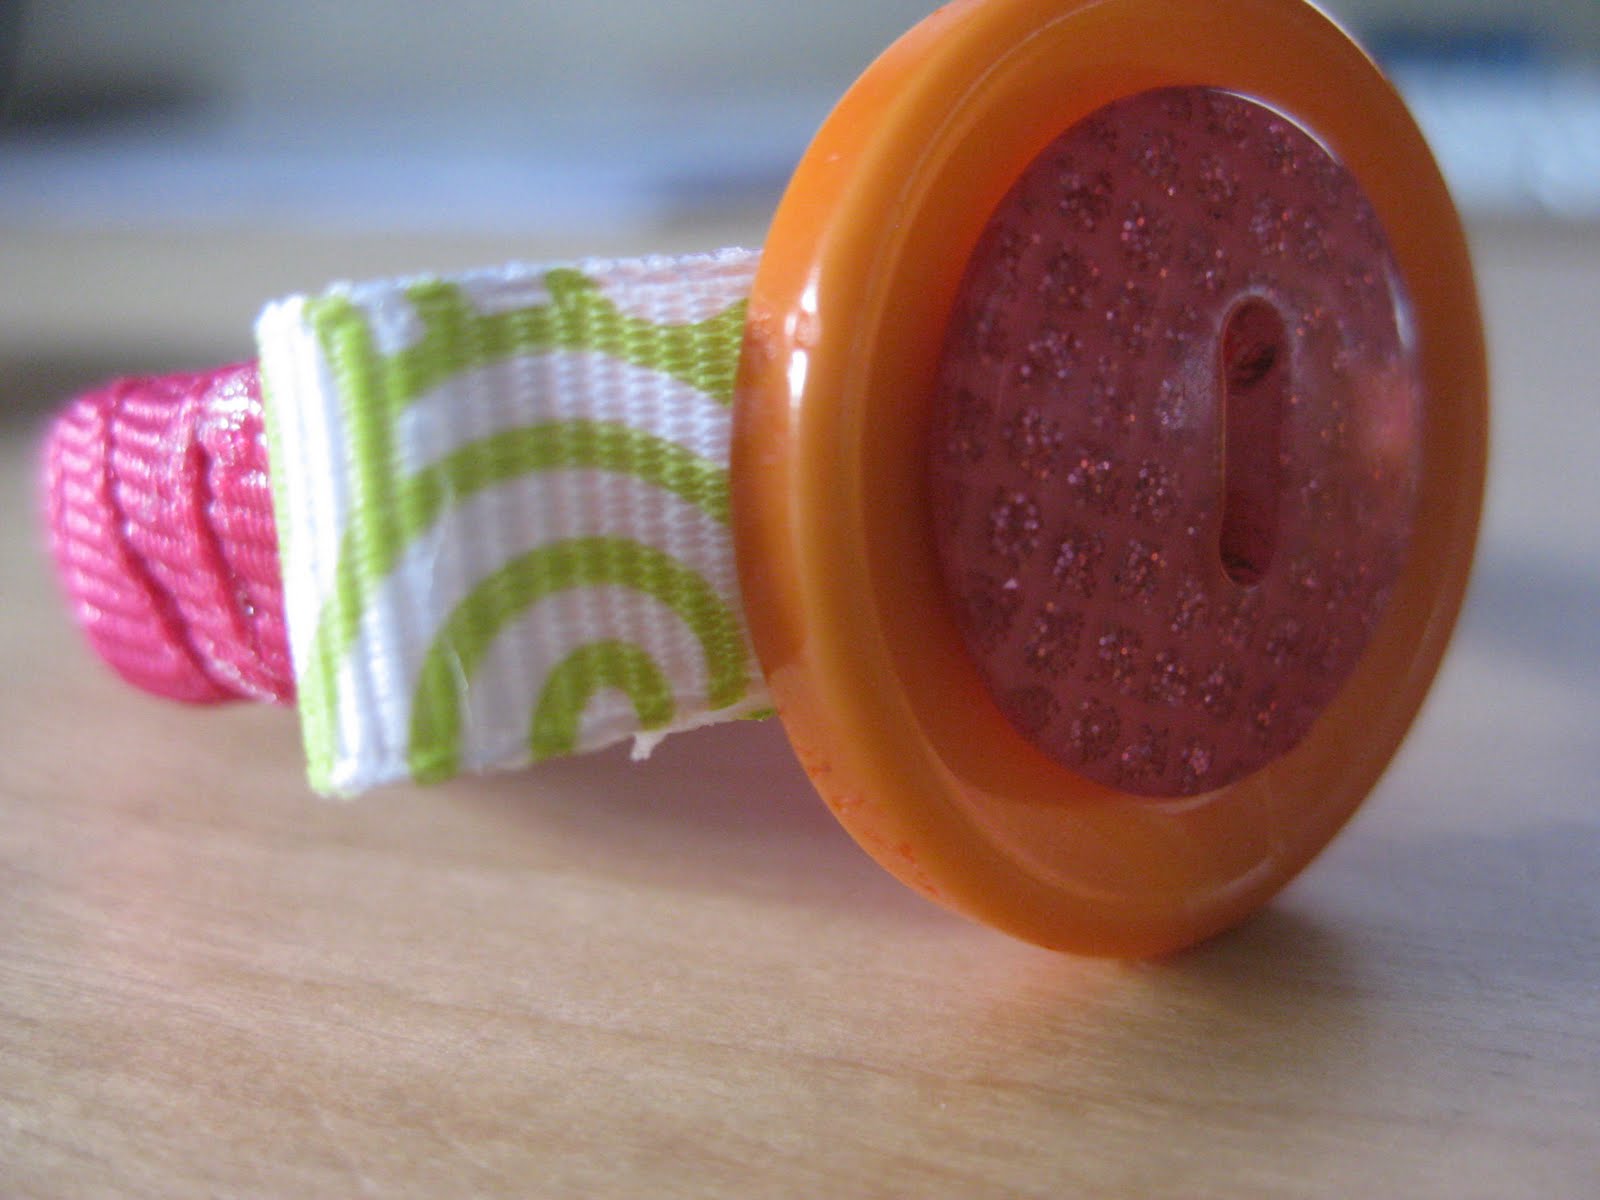
I took a scrap piece of fabric and made a little bow tie with it.  

Then I glued a couple of buttons to the top for a finished look.

You could also use tulle…

…or just the buttons themselves.


Now you have a set of four napkin rings ready for your next party!

Thanks Jen – Go check out Sunny Vanilla for a crafty read

Pennant Bunting

These are the windows in our office / playroom/ game room. They looked a little bare so I decided to spruce them up.

So here’s what I came up with:

The bunting has some pops of turquoise in it which matches with other bits of turquoise in the room.

I chose to use fabrics I had in my stash and stayed in the blue and orange families. After ironing the fabric I was ready to cut out my triangles.

I am an impatient crafter so I wanted to make this banner as quick as possible. I initially used a piece of cardboard that I had cut into a long triangle. FAILURE – this did not work. I cannot eyeball a triangle. I kept snipping away at it, after every few triangles I cut, and finally decided I needed a new plan.

I marched upstairs to my computer, printed out this triangle on card stock, and cut it out. My new template worked great.

Her’s a sampling on my fabric pieces. This picture is actually from the first few triangles which are not shaped like I wanted.

Roughly every six inches I pinned triangles to a long pieces of think white trim.

I then sewed two simple straight (ok, curvy) lines across the top and bottom of the trim.

Simply hung it with push pins after.

I love this so much that I’m thinking of all the places I could place pennant buntings in my house…Caroline’s room, on the stairs, a Christmas bunting, a birthday bunting, ……gotta go cut some triangles.

Halloween Mantle Part 2

This is the second part of our mantle how-tos. If you would like to see part one, go here.

FYI – I don’t feel too well and my daughter didn’t nap this afternoon so this will be short and sweet. I’m sure I will be back and wordy soon.

On Monday I shared how I made the spooky books, the branches and bats, and the banner. Part one includes a free printable of the banner.

Today we’re going to start off with the glittered skull.

I saw several versions of the glittered skull in stores but couldn’t decide which one I liked best so I waited until inspiration struck.

While browsing the Habitat for Humanity store I found two candlesticks, each for $1.00. When I saw them I instantly knew they were perfect for my skull project.

I also bought a foam skull from the craft store for $3.50 (with coupon). Sliver glitter is shown but I also mixed it with equal parts orange glitter once I started. And any good crafting project always uses Mod Podge.

First step: Brush some mod podge onto the skull – I found it best to cover about a quarter of the skull at a time.

Pour glitter over the mod podge.

Once the entire skull is covered with glitter and completely dry spray with surface sealer (found at craft store).

Hot glue the skull to the never touched perfect as is when bought candlesticks. Told you I wouldn’t be wordy.

My two completed glitter skulls sit on the extreme left and right of the mantle. Smaller versions of these skulls would also be fun to attach to a Halloween wreath.

Next up, the Three Witches  stamp art in the large frame.

As with the branches, I needed some height in the middle of the display so I used a frame I had stored in my closet. The skeleton directly in front of the frame was from a candle party I went to a long time ago.

I contemplated writing the “Three Witches” but decided against it because I was worried I would slant the ends of each sentence if I used a marker. In reality using the stamps presented the same problem. I did end up slanting a bit but I think it looks fine.

I took out my stamps from when I taught in the classroom and went to work late one night. It’s really a simple project but I think the variations in ink make the paper look a little old. This stamping turned out really well when I used it in a Thanksgiving display too.

I created a printable of the same scene which you can download here.


So I think that covers the mantle and the how to’s.

(The large spider web on the left is actually an outdoor light I bought on clearance a few years ago. The “31” is just a quick print out and framed. The haunted house is from a store in Wisconsin which I bought last year during a sisters weekend. The splashes of purple are Mardi Gras beads placed in flower jars.)

So in the end I was a tad wordy.

I’ll leave you with a quick Halloween joke. Enjoy.

Why was the skeleton afraid to cross the road?
It had no guts…:)

Weekend Bloggy Reading

Halloween Mantle with a Halloween Printable

After much pleading by our six year old, we made the trek upstairs to dig our Halloween decorations out of the storage closet. The kids spent many happy hours playing with plastic spiders and assembling a mini skeleton. I was overjoyed that I was able to have our house decorations up  in a little over an hour.

Here’s our Halloween mantle:

Today I will share with you three of the elements of the mantle – the bats & branches, the books, and the banner. Plus I have a printable, so keep reading.

First up, the bats and branches.

My challenge for the mantle each time I decorate it is to add height to the decorations. Our ceilings in this room are two stories tall so I try and have our display be on the same large scale.

The spray painted branches were used in previous holiday mantles. During Christmas they held ornaments while during Valentine’s they held hearts. Tuesday To Do Party

The bats were cut out of black construction paper last Halloween but were never used for a project so I thought they would be perfect taped to the trees.

The spooky books are simply books covered in white paper and taped together. It was frightening how many gorey words my two oldest could come up with in when faced with the task of creating titles for these books. I insisted we tone it down for the display.

Last year I created the “Trick or Treat” banner by cutting out orange triangles, pasting white circles with letters on it, and adding stickers for the symbols. After I modge podged it, poked holes in it and strung it by a ribbon, it was finally completed. Frankly, tons of work.

I wanted to create a printable for you and figured this would be easy to recreate. In fact, it was so easy, I’m going to create all my banners this way. 

The printable I created for you consist of 12 separate Halloween symbol triangles and 8 separate triangles with letters which will spell out “trick or treat“. You will need to print out the letters t and r multiple times.


I printed out the symbols on card stock, cut holes on the sides, and attached with string.

Here are five triangles which were chosen by my six year old to display by our entrance.  (Uhhh,yes…dirty mirror alert.)

If you’d like the Trick or Treat banner printable please click here.

*Please consider becoming a follower of Big D & Me if you decide to print the banner*

Wednesday I will share with you how I made the large Macbeth sign and the glittered skulls.

Do you have any favorite Halloween decorations in your home this year?

Making Todays Creative Blog Weekend Bloggy Reading

Coffee Table Change

Early last year I was walking around the Salvation Army when I spotted a $27.00 coffee table. The furniture caught my attention because it was quite large – 42 inches in diameter! At the time all five of us were living in an 800 sq.ft. apartment so this was not the ideal piece of furniture for me to pick up. However, I knew we would be moving into our much larger house within months and it was going to be in desperate need of a large coffee table. Hard to find for cheap. Soooooo…I bought it and it has remained as is for over a year.

Our 13 year old rug and Salvation Army coffee table

Besides just being a coffee table, this furniture is used as an ottoman, a toy holder, a cartoon watching seat, base during tag, and the origin for many leaps of faith to the couch.

Here’s the new and improved living room

Newly covered coffee table & two 5 x 8 IKEA rugs

I chose the bold graphic since it was similar to the one used in our connected kitchen

Here’s what we did to the coffee table

Took the fabric off and sanded down the wood

Stained the furniture – wore gloves for the messy job

Used the old fabric as a template for cutting the new fabric

The fabric is by Annie Selke and its called Links Indigo. I bought it through JoAnn’s fabric store when it was on sale for 60% off).

Used staple gun to secure fabric.

Sprayed scotchguard on the fabric

Hot glued the remaining edge down.

Cursed when I cut the fabric too close to the edge

Viola – this too can be yours in four short weeks

On the new IKEA carpet

Placed in its perfect spot

Perfect to jump to the couch from it

Perfect to jump to the chair from it

Just perfect

Next up – new pillows!

I have piles of fabric just waiting to be used.

Have you improved upon any old furniture lately?

******Remember to enter my giveaway which ends Thursday night******

Tuesday To Do Party Todays Creative Blog

The Kitchen Art Wall Reveal…Finally

Our kitchen art wall has been a long time in coming. I searched and searched etsy for just the right art. I chose pieces which were fun, bright, and made me smile. I made six printables for the wall as well.

Last time I left you I had given you this sneak peek at our wall

Here’s the completed wall

I am so excited with how it came out.

The five small frames are from Target, 2 others are from IKEA, 2 frames I already had, and 2 are from Goodwill. The frames I already owned and the ones from Goodwill were given a couple of coats of white paint.

Let me show you how we chose where to place the frames.

I knew I was working with an 44 x 44 space on the wall so my husband and I made a 44 x 44 template out of newspapers taped together.

Next we moved around the frames until we were happy with their placement

There is a wide variety of color in the pictures so I decided white frames would help give a cohesive look.

Where did those wonderful pieces of art come from you ask?

Clicking on the links below will direct you to the etsy shops or to my post with the free printables.

You are the Pancakes to My Syrup – Williston Letter Co

Olive You – free printable Big D & Me

Super Dean with Hamburger (made from individual pieces of paper) – Greenbean Art

Eat, Drink, and Be Merry – Graphic Anthology

If You Want Breakfast in Bed, Sleep in the Kitchen – free printable Big D & Me

Baby You Spin Me Right Round – Oh, Dear Molly

You Are My Hot Pot – Oh, Dear Molly

You Can’t Buy Happiness But You Can Buy Ice Cream & that’s Kind of the Same Thing – free printable Big D & Me

Hey Yogurt, If You’re so Cultured Why Do I Never See You at the Opera? – free printable Big D & Me

Lettuce Turnip the Beet (Let Us Turn Up the Beat) – free printable Big D & Me

Give Thanks – free printable Big D & Me

So that’s it. Our kitchen wall is finished.

Except that I want to change a few colors on the printables.

Maybe add another frame.

No. No. No. For now it’s done and I’m pleased it’s done.

Now onto our next big project.

Hmmm, my husbands not smiling.

I, for the life of me, can’t understand why.


Tuesday To Do Party Todays Creative BlogChic on a Shoestring Decorating Weekend Bloggy Reading

Kitchen Printables

This post was first published when I guest posted on Darling Doodles.

Today I am sharing with you three printables I made for our kitchen gallery wall.

Before I show you these prints I want you to understand that the art on my kitchen wall is on the cheesey groan inducing side. (I can hear the accolades now – “Yeah, she made us cheesey printables”). I would like to have some grown up sentimental art but it’s just not me. Instead I have prints I have bought which say, “You Are My Hot Pot,” and “You are the Syrup to my Pancakes.”

So ready or not consider yourself warned. If you are looking for Pottery Barn, you’ve come to the wrong place.

My first printable is a 4 x 6 message  – I think it speaks for itself.

My second printable is a 5 x 7 print. When I found this saying I knew it was meant for my family.

The third print is another 5 x 7 with a sweet little message but one that I always insist on exaggerating, “I luuuuurvvve you.”

Olive YouHere’s a peek at my kitchen gallery wall.

Hop on over to Big D & Me where I will soon be revealing the kitchen art wall and sharing where the other art work is from (hint: Etsy!)

Update: Here are three more kitchen printables

Give Thanks

Lettuce Turnip the Beet (Let Us Turn Up the Beat)

Cultured Yogurt


Click on the printables pictures in order to download a copy for yourself

If you decide to download a picture, please consider becoming a Big D & Me follower

Go here for the art wall revealed

Tuesday To Do Party Todays Creative BlogChic on a Shoestring Decorating Weekend Bloggy Reading

Inspired

One of the best parts about linking up to craft parties is perusing through other blogger projects. This week I have been inspired by many creations. Here are a few of my favorites:

Freshly Completed made this amazing Birthday Seat which slips over a chair. The word boy is removable since its attached with velcro and can be replaced by the word girl. If this seems too complicated even a hand made sign and balloons above the birthday chair would be special.

Minimoz created Super Hero shoes which would go over very well with the cape loving crowd at my house

Minimoz also created this love map which I will be replicating somehow somewhere in my house.  Inside the frame are three hearts made of maps which represent cities in which- “We met,” “We married,” & “We live.”

Britches and Boots gives a clear and simple tutorial for freezer paper stenciling – I just love this gnome shirt. The possibilities are endless.

One Artsy Momma shared a brillant way to capture first day of school memories. Wouldn’t it be so much fun to do these every year and place them in an album to share when they graduate from high school.

We Learn As We Go shares the simple recipe (even I might be successful with this) for Graham Cracker Toffee.

The Nature of Grace shared spoon puppets which I know my kids would love making


The Mommy Diaries organized a delightful The Very Hungery Caterpillar 1st Birthday for her son

We are beginning to prepare for Halloween party and Design DNA has created something I will surely be adding to our decor. I can’t wait to fill the jars with eyeballs and growing body parts.

I am going to be busy this weekend working on some new projects.

Did you see anything that inspired you?

Guest Post by Michelle Paige

I have a special treat for you today.

Michelle Paige has graciously agreed to guest post here today.
Her blog has so many creative ideas for any occasion.

Some of my favorites from her site are Knights in Training Birthday, Lollipop Valentines, Easter Egg Heads, and an “About to Pop” Baby Shower.

Take a moment and explore her site. I promise you won’t be disappointed.

Hi!  I’m Michelle Paige and today is my very first guest post, ever!!
This is so exciting, I hope I don’t mess up!  Thanks for having me, Jennifer!

My blog is called ‘Michelle Paige’.  (Super creative name, huh?)
I sort of fell into the blogging world one night last February and I haven’t been able to stop!
How fun it is ‘meeting’ amazing women who share such inspiring ideas and insights through their blogs!
Over at ‘Michelle Paige’ I love to blog about crafty ideas, party decor, organization tips, family activities, faith thoughts and my favorite kid craft projects!
Speaking of kid craft projects…you won’t believe this one…
Painter’s Tape Canvas Art
I know…I know…it doesn’t look like a kid made this!
 With just a tiny bit of supervision and guidance—
and lots of play time in between steps—
my 9 year old really made this!
He’s very proud of himself, too!
(Unlike my 10 year old daughter who hides when she sees the camera
— fearing that I might post a picture of her!)
See just how simple this is…
Start with a piece of canvas board.
You can find canvas board at your local craft store or art supply place.
Look for sales or use coupons, canvas can be a bit pricey!
We found this 10in x 20in. piece for half off.
(If I’d been smarter, I would have bought out their stock at those prices!)
Any size of canvas board will work.
Now choose your colors!
I chose brown for the lines and my current favorite decorating colors:
turquoise, leaf green, north sea blue
and white (somehow the white didn’t get into the picture?)
Inexpensive acrylic craft paint works perfectly.
(Or use any leftover paint you may already have.)
Cover your area with newspapers.
Using a foam brush, paint (or have your child paint) the entire canvas board with the line color of your choice.
We used a brown velvet color.
Now, wait about 30 minutes (go play), then paint a second coat.
(We only did 2 coats, but I think 3 would have been a bit better.)
After the board is completely dry (or playtime is over), it’s time to tape.
Use painter’s tape to make straight line shapes on the board.
(We used 1 inch wide Scotch 3M Blue Painter’s Tape.)
The only rule is to keep the tape straight, don’t try to curve the tape.
Make squares, rectangles, triangles, funky 4-sided shapes, etc.
Some shapes can be small, others can be over-sized.
Once you’re happy with the taped design, press tape firmly.
Get out the line paint color again and lightly paint another coat.
This time paint especially along the edges of the tape.
(You can skip this step, but you’ll be sorry!  Trust me!)
This extra step allows no colors to bleed through the tape.
Go play for 30 minutes while the board is drying.
(My son specifically asked that I posted this picture of him with his twisty balloon battle gear!)
To see more of our twisty balloon adventures go here.
Okay, back to our project.
It’s time to get out those pretty colors!
We used a paper plate and a different foam brush for each color.
There are only two rules for this step.
Rule 1) Do not put the same color next to each other.
(You don’t want a green square up against a green triangle.  Mix them up.)
Rule 2)  Paint a little out of the lines onto the tape.
(Yep, you get to go out of the lines!)
Let first coat dry, paint second coat, let dry.
If you are still seeing your line color through the paint, do a third color coat.
After everything is dry…It’s time!  It’s time!
It’s time to peel off the tape and see your creation!
Look at those perfect lines!
Can you believe it?  It’s so beautiful!
Display it on your mantle for all to see!
You’ll need to start taking orders for family Christmas gifts, now!
__________________________
Just so you don’t think I’m some brillant crafting genius who thought this up myself…
This idea was um…borrowed from here.
My son attended art camp and came home with this creation.
I was completely blown away and had to know how he did this!
He loved teaching me all the steps…I’m just sharing the love!!  Enjoy!
I’d love to have you stop by my blog and say ‘hi’!

 Thanks again for having me, Jennifer!

CARS Bingo & Party

When Alex turned 5 four years ago he requested a CARS party.

It was tons of fun and fairly easy to put together.

Since it was a race car party we needed a race track cake. The track is made of black sugar crystals while the side boards are cardboard. We made the “start” and “finish” signs and placed some of his hot wheels on the cake.

Race Car Birthday Cake

The first activity of the party was to take some Crayola Air-Dry Clay and use it to form their own race cars. This activity didn’t turn out as well as I would have liked. Some of the kids were not satisfied with their creations and complained since it didn’t look like Lightning McQueen.

While the clay didn’t go over so well, the bean bag toss was a huge hit. We took a large piece of wood, cut 5 holes in them, and modged podged some large CARS stickers on with various point values underneath. HUGE HIT with the 5 year old crowd.

Creating Cars from Air-Dry Clay
Bean Bag Toss

Another favorite outdoor activity was “The Big Race.” Alex and I decorated 2 diaper boxes and turned them into cars. Alex put race numbers on them as well as headlights and wheels. Two at at a time the kids raced around the yard usually laughing the entire time. The plastic helmets I bought added to the excitement.

“The Big Race”
Little Brother wants to play too

After running around the backyard the kids were ready for an inside activity. I made the CARS Bingo cards, laminated them, and created call cards. I went a little over board and created 15 individual cards. All of the kids loved the bingo game and played several rounds.

CARS Bingo Game
It’s a Printable!

Would you like a copy of the CARS BINGO game?

Please go here & print a copy.

Please consider becoming a follower of Big D and Me if you decide to download the game

Having difficulty downloading? Contact me and I’ll email you a copy.

Todays Creative BlogTuesday To Do Party A Crafty Soiree Weekend Bloggy Reading